CaseI want to create my own custom SSIS task with a GUI. How do you do that?
SolutionFor this example I will create a very basic task which you can extend for your own needs. It checks whether a file exists. The task is for SSIS 2008 and 2012 and I will use Visual Studio 2010 to create the it. Programming language is C#. Use
this page to translate the code to VB.Net if you prefer that language.
![]() |
| My first SSIS task |
1) Create Visual Studio projectFor my task I used two C# Class Library projects. One for the GUI/editor and one for the code. For SSIS 2008 I will use .Net framework 3.5 and for SSIS 2012 I will use .Net framework 4.0
![]() |
| Two projects for my Task |
2) Create key for strongnameYou need to strongname your DLL's so that SSIS can use them. More about that in this Codeguru article:
Giving a .NET Assembly a Strong Name. Open the Visual Studio 2010 Command Prompt (in Windows start menu). Browse to your project folder and execute the following command to create a key file:
sn.exe -k myTask.snk
![]() |
| Microsoft (R) .NET Framework Strong Name Utility |
3) Add key to projectThe key file should be added to both projects.
![]() |
| Add key to projects |
And after adding them, you need to sign the projects. Go to the properties of the projects and then to the Signing page. There you can sign the assembly with your newly generated key. Do this for both projects.
![]() |
| Sign Assembly |
4) Adding SSIS referenceWe need to add references to SSIS libraries. The GUI project needs two references:
- Microsoft.SqlServer.Dts.Design
- Microsoft.SQLServer.ManagedDTS
And the code project only needs one reference:
- Microsoft.SQLServer.ManagedDTS
For
SSIS 2008 they can be found in the program files folder. Something like:
C:\Program Files (x86)\Microsoft SQL Server\100\SDK\Assemblies\Microsoft.SQLServer.ManagedDTS.dllAnd for
SSIS 2012 they are located in the GAC. Something like:
C:\Windows\Microsoft.NET\assembly\GAC_MSIL\Microsoft.SqlServer.ManagedDTS\v4.0_11.0.0.0__89845dcd8080cc91\Microsoft.SqlServer.ManagedDTS.dll![]() |
| Add references |
5) Build EventsTo use the task dll's in SSIS you need to copy them to the GAC and to the task folder of SSIS. With the Build Events you can do that automatically when you build the visual studio project. Go to the properties of your projects and then to the Build Events. Add the following command to the Post-Build events.
2008cd $(ProjectDir)@SET TASKDIR="C:\Program Files (x86)\Microsoft SQL Server\100\DTS\Tasks\"
@SET GACUTIL="C:\Program Files (x86)\Microsoft SDKs\Windows\v7.0A\bin\gacutil.exe"Echo Installing dll in GAC
Echo $(OutDir)
Echo $(TargetFileName)
%GACUTIL% -if "$(OutDir)$(TargetFileName)"Echo Copying files to Tasks
copy "$(OutDir)$(TargetFileName)" %TASKDIR%2012cd $(ProjectDir)
@SET TASKDIR="C:\Program Files (x86)\Microsoft SQL Server\110\DTS\Tasks\"
@SET GACUTIL="C:\Program Files (x86)\Microsoft SDKs\Windows\v7.0A\Bin\NETFX 4.0 Tools\gacutil.exe"
Echo Installing dll in GAC
Echo $(OutDir)
Echo $(TargetFileName)
%GACUTIL% -if "$(OutDir)$(TargetFileName)"
Echo Copying files to Tasks
copy "$(OutDir)$(TargetFileName)" %TASKDIR%![]() |
| Post-build events |
6) IconsI have added the same icon file to both projects. In the properties of the icon file you have to set Build Action to "Embedded Resource". In the UI project you can use the icon in your Windows Form. This will show when you edit the task.
![]() |
| Icon for editor |
In the other project you can use this file to give your task a custom icon instead of the default. This will show in the SSIS Toolbox and in the Control Flow. Code is explained later on.
![]() |
| Icon for SSIS Toolbox and Control Flow |
7) Gui project codeTo keep everything clear and easy to explain I created a simple task. In the GUI you can choose a file connection manager or a string variable. The task will use the value in runtime to check if the filepath exists. See the code comments for the explanation.
myTaskInterface.cs
// C# code
using System;
using System.Collections.Generic;
using System.Linq;
using System.Text;
using Microsoft.SqlServer.Dts.Runtime;
using Microsoft.SqlServer.Dts.Runtime.Design;
using System.Windows.Forms;

// Interface for task editor
namespace SSISJoost
{
    public class myTaskInterface : IDtsTaskUI
    {
        private TaskHost _taskHost;
        private IServiceProvider _serviceProvider;

        public myTaskInterface()
        {
        }

        public void Initialize(TaskHost taskHost, IServiceProvider serviceProvider)
        {
            this._taskHost = taskHost;
            this._serviceProvider = serviceProvider;
        }

        public ContainerControl GetView()
        {
            myTaskUI.myTaskEditor editor = new myTaskUI.myTaskEditor();
            editor.TaskHost = this._taskHost;
            editor.ServiceProvider = this._serviceProvider;
            return editor;
        }

        public void Delete(IWin32Window parentWindow)
        {
        }

        public void New(IWin32Window parentWindow)
        {
        }
    }
}
myTaskEditor.cs (code behind from windows form)
// C# code
using System;
using System.Collections.Generic;
using System.ComponentModel;
using System.Data;
using System.Drawing; // Reference added
using System.Linq;
using System.Text;
using System.Windows.Forms; // Reference added
using Microsoft.SqlServer.Dts.Runtime;
using Microsoft.SqlServer.Dts.Runtime.Design;
namespace SSISJoost.myTaskUI
{
public partial class myTaskEditor : Form
{
#region General Task Methods
// Setting and getting taskhost
private TaskHost _taskHost;
public TaskHost TaskHost
{
get { return _taskHost; }
set { _taskHost = value; }
}
// Getting connections, setting is done with ServiceProvider
private Connections _connections;
public Connections connections
{
get { return _connections; }
}
// Gets or sets the serviceprovider. Used for getting
// f.a. the VariablesProvider and ConnectionsProvider
private IServiceProvider _serviceProvider = null;
public IServiceProvider ServiceProvider
{
get
{
return _serviceProvider;
}
set
{
_serviceProvider = value;
_connections = ((IDtsConnectionService)(value.GetService(typeof(IDtsConnectionService)))).GetConnections();
}
}
// Default constructor
public myTaskEditor()
{
InitializeComponent();
}
// Constructor to set taskhost and serviceprovider
// See GetView in myTaskInterface.cs
public myTaskEditor(TaskHost taskHost, IServiceProvider serviceprovider)
{
InitializeComponent();
this.TaskHost = taskHost;
this.ServiceProvider = serviceprovider;
}
#endregion
#region Page Load
private void myTaskEditor_Load(object sender, EventArgs e)
{
// Fill the ComboBox with connection managers from the package,
// but only select FILE, FLATFILE and EXCEL connection managers.
if (this._taskHost != null && this._connections != null)
{
cmbConnectionsSource.Items.Clear();
cmbConnectionsSource.DisplayMember = "Name";
cmbConnectionsSource.ValueMember = "ID";
cmbConnectionsSource.Items.Add("<Choose connectionmanager>");
cmbConnectionsSource.Items.Add("<New connectionmanager>"); // open new connection manager popup
foreach (ConnectionManager connection in this._connections)
{
if (connection.CreationName == "FILE")
{
cmbConnectionsSource.Items.Add(connection);
}
else if (connection.CreationName == "EXCEL")
{
cmbConnectionsSource.Items.Add(connection);
}
else if (connection.CreationName == "FLATFILE")
{
cmbConnectionsSource.Items.Add(connection);
}
}
}
// Fill the ComboBox with variables from the package,
// but only show string variables and non-system variables
if (this._taskHost != null && this._taskHost.Variables != null)
{
cmbVariablesSource.Items.Clear();
cmbVariablesSource.DisplayMember = "Name";
cmbVariablesSource.ValueMember = "QualifiedName";
cmbVariablesSource.Items.Add("<Choose variable>");
cmbVariablesSource.Items.Add("<New variable>"); // open new variabele popup
foreach (Variable variable in _taskHost.Variables)
{
if ((!variable.SystemVariable) && (variable.DataType == TypeCode.String))
{
this.cmbVariablesSource.Items.Add(variable);
}
}
}
// Get the properties from the Task and fill the form.
if (this._taskHost != null)
{
// Only fill form if a value is found in the properties
if (this._taskHost.Properties["HasConnectionmanagerSource"] != null)
{
// A connection manager is selected
if ((bool)this._taskHost.Properties["HasConnectionmanagerSource"].GetValue(_taskHost))
{
this.radConnectionSource.Checked = true;
this.cmbConnectionsSource.Enabled = true;
this.cmbVariablesSource.Enabled = false;
this.cmbVariablesSource.SelectedIndex = 0;
// Set the ConnectionManagerID
if (this._taskHost.Properties["SelectedConnectionManagerIDSource"] != null)
{
object obj = this._taskHost.Properties["SelectedConnectionManagerIDSource"].GetValue(_taskHost);
if (obj == null)
{
// No connection manager in property
this.cmbConnectionsSource.SelectedIndex = 0;
}
else
{
ConnectionManager cm = null;
cm = FindConnectionManager(obj.ToString().Trim());
if (cm != null)
{
// Connection manager found, now select it in combobox
this.cmbConnectionsSource.SelectedItem = cm;
}
else
{
// Connection manager not found
this.cmbConnectionsSource.SelectedIndex = 0;
}
}
}
}
// A variable is selected
else
{
this.radVariableSource.Checked = true;
this.cmbVariablesSource.Enabled = true;
this.cmbConnectionsSource.Enabled = false;
this.cmbConnectionsSource.SelectedIndex = 0;
// Set the VariableID
if (this._taskHost.Properties["SelectedVariableIDSource"] != null)
{
object obj = this._taskHost.Properties["SelectedVariableIDSource"].GetValue(_taskHost);
if (obj == null)
{
// No variable in property
this.cmbVariablesSource.SelectedIndex = 0;
return;
}
Variable var = FindVariable(this._taskHost.Properties["SelectedVariableIDSource"].GetValue(_taskHost).ToString().Trim());
if (var != null)
{
// Variable found, now select it in combobox
this.cmbVariablesSource.SelectedItem = var;
}
else
{
// Variable not found
this.cmbVariablesSource.SelectedIndex = 0;
}
}
}
}
}
// Initial values (for new tasks)
else
{
this.radConnectionSource.Checked = true;
this.cmbConnectionsSource.Enabled = true;
this.cmbConnectionsSource.SelectedIndex = 0;
this.cmbVariablesSource.Enabled = false;
this.cmbVariablesSource.SelectedIndex = 0;
}
}
#endregion
#region Button Methods OK end Cancel
private void btnCancel_Click(object sender, EventArgs e)
{
// Cancel editor / close window
this.DialogResult = DialogResult.Cancel;
this.Close();
}
private void btnSave_Click(object sender, EventArgs e)
{
// Safe Source values (radiobutton, connectionmanager, variable) in tasks properties.
// Selected Connection Manager or Variable is available via variables that where
// filled by onchange events from the comboboxes.
this._taskHost.Properties["HasConnectionmanagerSource"].SetValue(this._taskHost, radConnectionSource.Checked);
if (radConnectionSource.Checked)
{
this._taskHost.Properties["SelectedVariableIDSource"].SetValue(this._taskHost, string.Empty);
if (this.cmbConnectionsSource.SelectedIndex != 0)
{
this._taskHost.Properties["SelectedConnectionManagerIDSource"].SetValue(this._taskHost, selectedConnectionManagerSource.ID);
}
else
{
this._taskHost.Properties["SelectedConnectionManagerIDSource"].SetValue(this._taskHost, string.Empty);
}
}
else
{
this._taskHost.Properties["SelectedConnectionManagerIDSource"].SetValue(this._taskHost, string.Empty);
if (this.cmbVariablesSource.SelectedIndex != 0)
{
this._taskHost.Properties["SelectedVariableIDSource"].SetValue(this._taskHost, selectedVariableSource.ID);
}
else
{
this._taskHost.Properties["SelectedVariableIDSource"].SetValue(this._taskHost, string.Empty);
}
}
// Close editor
this.DialogResult = DialogResult.OK;
this.Close();
}
#endregion
#region Onchange events methods Comboboxes
// Variable to store the selected connectionmanager. It will be filled by
// the SelectedIndexChange event and used by the OK button click event.
private ConnectionManager selectedConnectionManagerSource = null;
// Method to set the selected connectionmanager
private void cmbConnectionsSource_SelectedIndexChanged(object sender, EventArgs e)
{
ComboBox combobox = (ComboBox)sender;
// If <Choose connectionmanager> is selected then empty the textbox with the path
if (combobox.SelectedIndex == 0)
{
this.txtFilePathFinalSource.Text = "";
return;
}
// If <New connectionmanager> is selected then popup to create a new connection manager
if (combobox.SelectedIndex == 1)
{
int currentdIndex = -1;
IDtsConnectionService _dtsConnectionService = _serviceProvider.GetService(typeof(IDtsConnectionService)) as IDtsConnectionService;
System.Collections.ArrayList createdConnection = _dtsConnectionService.CreateConnection(Prompt.ShowConnectionManagerTypeDialog());
if (createdConnection.Count > 0)
{
ConnectionManager newConnectionManager = (ConnectionManager)createdConnection[0];
_dtsConnectionService.AddConnectionToPackage(newConnectionManager);
currentdIndex = combobox.Items.Add(newConnectionManager);
combobox.SelectedIndex = currentdIndex;
return;
}
else
{
// Cancel was clicked in popup
combobox.SelectedIndex = 0;
return;
}
}
// Fill the private variable to store the selected connectionmanager
selectedConnectionManagerSource = (ConnectionManager)combobox.SelectedItem;
// If the variable is still null then clear form
if (selectedConnectionManagerSource == null)
{
this.cmbConnectionsSource.SelectedIndex = 0;
this.txtFilePathFinalSource.Text = "";
return;
}
// Get the path of the connectionmanager. For Excel connectionmanagers
// you should use ExcelFilePath property instead of the connectionstring
if (selectedConnectionManagerSource.CreationName == "EXCEL")
{
this.txtFilePathFinalSource.Text = selectedConnectionManagerSource.Properties["ExcelFilePath"].GetValue(selectedConnectionManagerSource).ToString();
}
else
{
this.txtFilePathFinalSource.Text = selectedConnectionManagerSource.ConnectionString;
}
}
// Variable to store the selected variable. It will be filled by
// the SelectedIndexChange event and used by the OK button click event.
private Variable selectedVariableSource = null;
// Method to set the selected variable
private void cmbVariablesSource_SelectedIndexChanged(object sender, EventArgs e)
{
ComboBox combobox = (ComboBox)sender;
// If <Choose variable> is selected then empty the textbox with the path
if (combobox.SelectedIndex == 0)
{
this.txtFilePathFinalSource.Text = "";
return;
}
// If <New variable> is selected then popup to create a new variable
if (combobox.SelectedIndex == 1)
{
int currentdIndex = -1;
IDtsVariableService _dtsVariableService = _serviceProvider.GetService(typeof(IDtsVariableService)) as IDtsVariableService;
Variable newVariable = _dtsVariableService.PromptAndCreateVariable(this, null, "FilePath", "User", typeof(String));
if (newVariable != null)
{
currentdIndex = combobox.Items.Add(newVariable);
combobox.SelectedIndex = currentdIndex;
return;
}
else
{
// Cancel was clicked in popup
combobox.SelectedIndex = 0;
return;
}
}
// Fill the private variable to store the selected variable
selectedVariableSource = (Variable)combobox.SelectedItem;
// If the variable is still null then clear form
if (selectedVariableSource == null)
{
this.cmbVariablesSource.SelectedIndex = 0;
this.txtFilePathFinalSource.Text = "";
return;
}
// Show path in textbox
this.txtFilePathFinalSource.Text = (String)selectedVariableSource.Value;
}
#endregion
#region Radio buttons
private void radConnectionSource_CheckedChanged(object sender, EventArgs e)
{
// Enable/disable other fields when
// the radio button changes
RadioButton rad = (RadioButton)sender;
if (!rad.Checked)
{
this.cmbConnectionsSource.Enabled = false;
this.cmbVariablesSource.Enabled = true;
if (this.cmbVariablesSource.SelectedIndex != 0)
{
Variable var = ((Variable)this.cmbVariablesSource.SelectedItem);
if (var != null)
{
this.txtFilePathFinalSource.Text = ((Variable)this.cmbVariablesSource.SelectedItem).Value.ToString();
}
}
}
}
private void radVariableSource_CheckedChanged(object sender, EventArgs e)
{
// Enable/disable other fields when
// the radio button changes
RadioButton rad = (RadioButton)sender;
if (!rad.Checked)
{
this.cmbConnectionsSource.Enabled = true;
this.cmbVariablesSource.Enabled = false;
if (this.cmbConnectionsSource.SelectedIndex != 0)
{
ConnectionManager temp = ((ConnectionManager)this.cmbConnectionsSource.SelectedItem);
if (temp != null)
{
if (temp.CreationName == "EXCEL")
{
this.txtFilePathFinalSource.Text = temp.Properties["ExcelFilePath"].GetValue(temp).ToString();
}
else
{
this.txtFilePathFinalSource.Text = temp.ConnectionString;
}
}
}
}
}
#endregion
#region Methods to find Connectionmanager and Variable by id
private ConnectionManager FindConnectionManager(string connectionManagerID)
{
// This methods loops through all connection managers
// and returns the one that matches the GUID.
foreach (ConnectionManager connManager in this._connections)
{
if (connManager.ID == connectionManagerID)
{
return connManager;
}
}
return null;
}
private Variable FindVariable(string variableID)
{
// This methods loops through all variables
// and returns the one that matches the GUID.
foreach (Variable var in this._taskHost.Variables)
{
if (var.ID == variableID)
{
return var;
}
}
return null;
}
#endregion
}
#region ShowConnectionManagerTypeDialog
// A dialog for creating a new Connection Manager.
// You can choose between File, FLATFILE or EXCEL
// and then the corresponding dialog will open.
// This could also be done in a seperate windows
// form which is easier to format.
public static class Prompt
{
public static string ShowConnectionManagerTypeDialog()
{
Form prompt = new Form();
prompt.Width = 300;
prompt.Height = 200;
prompt.Text = "Choose Connection Manager type";
prompt.MaximizeBox = false;
prompt.MinimizeBox = false;
prompt.ControlBox = false;
RadioButton radConnectionManagerFile = new RadioButton() { Left = 50, Top = 20, Width = 200, Text = "Connection manager for files", Checked = true };
RadioButton radConnectionManagerFlatFile = new RadioButton() { Left = 50, Top = 50, Width = 200, Text = "Connection manager for flat files" };
RadioButton radConnectionManagerExcel = new RadioButton() { Left = 50, Top = 80, Width = 200, Text = "Connection manager for Excel files" };
Button confirmation = new Button() { Text = "Ok", Left = 150, Width = 100, Top = 110 };
confirmation.Click += (sender, e) => { prompt.Close(); };
prompt.Controls.Add(confirmation);
prompt.Controls.Add(radConnectionManagerFile);
prompt.Controls.Add(radConnectionManagerFlatFile);
prompt.Controls.Add(radConnectionManagerExcel);
prompt.Location = new Point(Screen.PrimaryScreen.WorkingArea.Width / 2 - prompt.Width / 2, Screen.PrimaryScreen.WorkingArea.Height / 2 - prompt.Height / 2);
prompt.ShowDialog();
string res = "";
if (radConnectionManagerExcel.Checked)
{
res = "EXCEL";
}
else if (radConnectionManagerFlatFile.Checked)
{
res = "FLATFILE";
}
else
{
res = "FILE";
}
return res;
}
}
#endregion
}
8) Get PublicKeyTokenFor the other project you need the PublicKeyToken of the GUI assembly. So first build the GUI project and then, via the same command prompt of step 2, execute the following command in the BIN folder of your GUI project:
sn.exe -T SSISJoost.myTaskUI.dll![]() |
| Copy the number generated. You need it in the next project. |
9) The code for the actual workThis is the code from the project that does the actual work during runtime. See the comments for the explanation.
// C# code
using System;
using System.Collections.Generic;
using System.Linq;
using System.Text;
using Microsoft.SqlServer.Dts.Runtime;
using System.ComponentModel;
using System.Xml;
using System.IO;

namespace SSISJoost
{
    // Connection to the editor assembly. Copy the PublicKeyToken from the previous step.
    [DtsTask(
    DisplayName = "My Task",
    TaskType = "myTask",
    TaskContact = "SSISJOOST Example",
    IconResource = "SSISJoost.myTask.ico",
    UITypeName = "SSISJoost.myTaskInterface, SSISJoost.myTaskUI, Version=1.0.0.0, Culture=Neutral,PublicKeyToken=80664248b6de6485",
    RequiredProductLevel = DTSProductLevel.None)]
    public class myTask : Task, IDTSComponentPersist
    {

        #region Get Set Properties
        /*
         * The properties of my task that will be
         * saved in the XML of the SSIS package.
         * You can add a Category and Description
         * for each property making it clearer.
         */
        private bool _hasConnectionmanagerSource = true;
        [CategoryAttribute("my Task Source")]
        [Description("True if a connectionmanager is used for the task as source. False if a variable is used.")]
        public bool HasConnectionmanagerSource
        {
            get { return this._hasConnectionmanagerSource; }
            set
            {
                this._hasConnectionmanagerSource = value;
            }
        }

        private string _selectedConnectionManagerIDSource = "";
        [CategoryAttribute("my Task Source")]
        [Description("GUID of the selected source connectionmanager. If a variable is used, then 'SelectedVariableIDSource' is <null>")]
        public string SelectedConnectionManagerIDSource
        {
            get { return this._selectedConnectionManagerIDSource; }
            set { this._selectedConnectionManagerIDSource = value; }
        }

        private string _selectedVariableIDSource = "";
        [CategoryAttribute("my Task Source")]
        [Description("GUID of the selected source variable. If a variable is used, then 'SelectedConnectionManagerIDSource' is <null>")]
        public string SelectedVariableIDSource
        {
            get { return this._selectedVariableIDSource; }
            set { this._selectedVariableIDSource = value; }
        }
        #endregion

        #region Version
        public string Version
        {
            get
            {
                return System.Diagnostics.FileVersionInfo.GetVersionInfo(System.Reflection.Assembly.GetExecutingAssembly().Location).ToString();
            }
        }
        #endregion

        #region Variables for internal use
        private ConnectionManager _selectedConnectionManagerSource = null;
        private Variable _selectedVariableSource = null;
        private string _filePathSource = "";
        #endregion

        #region Constructor
        public myTask()
        {

        }
        #endregion

        #region Overrides for Task
        public override void InitializeTask(Connections connections, VariableDispenser variableDispenser, IDTSInfoEvents events, IDTSLogging log, EventInfos eventInfos, LogEntryInfos logEntryInfos, ObjectReferenceTracker refTracker)
        {
            base.InitializeTask(connections, variableDispenser, events, log, eventInfos, logEntryInfos, refTracker);
        }

        public override DTSExecResult Validate(Connections connections, VariableDispenser variableDispenser, IDTSComponentEvents componentEvents, IDTSLogging log)
        {

            // If we have used a ConnectionManager then we check if we have a valid one !
            if (HasConnectionmanagerSource)
            {
                try
                {
                    // Check if a connection manager is selected in the combobox
                    if (String.IsNullOrEmpty(this._selectedConnectionManagerIDSource))
                    {
                        throw new ApplicationException("Connectionmanager is mandatory for source");
                    }

                    // Check if the selected connection manager still exists
                    if (FindConnectionManager(connections, _selectedConnectionManagerIDSource) == null)
                    {
                        throw new ApplicationException("Invalid connectionmanager for source");
                    }
                }
                catch (System.Exception e)
                {
                    componentEvents.FireError(0, "My Task", "Invalid Source Connectionmanager.", "", 0);
                    return DTSExecResult.Failure;
                }
            }
            else
            // If we decided to use a Variable we at least must have chosen one !
            {
                if (String.IsNullOrEmpty(this._selectedVariableIDSource))
                {
                    componentEvents.FireError(0, "My Task", "Selected Source Variable is mandatory", "", 0);
                    return DTSExecResult.Failure;
                }
            }


            /*
             * If you want to do some checks with the value from the connection manager or variable then
             * you have to get that value. You can copy the code from the execute and then use that to
             * validate the filepath from the connection manager or variable.
             */

            return DTSExecResult.Success;
        }

        public override DTSExecResult Execute(Connections connections, VariableDispenser variableDispenser, IDTSComponentEvents componentEvents, IDTSLogging log, object transaction)
        {

            // Do the base Validation, if result is OK, then we continue
            if (base.Execute(connections, variableDispenser, componentEvents, log, transaction) == DTSExecResult.Failure)
            {
                return DTSExecResult.Failure;
            }

            // Get the value from the connection manager or variable
            if (HasConnectionmanagerSource)
            {
                _selectedConnectionManagerSource = FindConnectionManager(connections, _selectedConnectionManagerIDSource);
                _filePathSource = GetFilePathSource(_selectedConnectionManagerSource);
            }
            else
            {
                _selectedVariableSource = FindVariable(variableDispenser, _selectedVariableIDSource);
                _filePathSource = GetFilePathSource(_selectedVariableSource);
            }

            if (!File.Exists(_filePathSource))
            {
                componentEvents.FireError(0, "My Task", "File " + _filePathSource + " doesn't exist", "", 0);
                return DTSExecResult.Failure;
            }
            else
            {
                return DTSExecResult.Success;
            }
        }
        #endregion

        #region Methods for IDTSComponentPersist
        void IDTSComponentPersist.LoadFromXML(System.Xml.XmlElement node, IDTSInfoEvents infoEvents)
        {
            // This might occur if the task's XML has been modified outside of the Business Intelligence
            // Or SQL Server Workbenches.
            if (node.Name != "UnzipTask")
            {
                throw new Exception(string.Format("Unexpected task element when loading task - {0}.", "UnzipTask"));
            }
            else
            {
                // populate the private property variables with values from the DTS node.
                this._hasConnectionmanagerSource = Convert.ToBoolean(node.Attributes.GetNamedItem("HasConnectionmanagerSource").Value);
                this._selectedConnectionManagerIDSource = node.Attributes.GetNamedItem("SelectedConnectionManagerIDSource").Value;
                this._selectedVariableIDSource = node.Attributes.GetNamedItem("SelectedVariableIDSource").Value;
            }
        }

        void IDTSComponentPersist.SaveToXML(System.Xml.XmlDocument doc, IDTSInfoEvents infoEvents)
        {
            //create node in the package xml document
            XmlElement taskElement = doc.CreateElement(string.Empty, "UnzipTask", string.Empty);

            // create attributes in the node that represent the custom properties and add each to the element

            // Boolean indicating if you are using a connection manager or variable
            XmlAttribute UnzipTaskXmlAttribute = doc.CreateAttribute(string.Empty, "HasConnectionmanagerSource", string.Empty);
            UnzipTaskXmlAttribute.Value = this._hasConnectionmanagerSource.ToString();
            taskElement.Attributes.Append(UnzipTaskXmlAttribute);

            // The GUID from the connection manager
            UnzipTaskXmlAttribute = doc.CreateAttribute(string.Empty, "SelectedConnectionManagerIDSource", string.Empty);
            UnzipTaskXmlAttribute.Value = this._selectedConnectionManagerIDSource.ToString();
            taskElement.Attributes.Append(UnzipTaskXmlAttribute);

            // The GUID from the variable
            UnzipTaskXmlAttribute = doc.CreateAttribute(string.Empty, "SelectedVariableIDSource", string.Empty);
            UnzipTaskXmlAttribute.Value = this._selectedVariableIDSource.ToString();
            taskElement.Attributes.Append(UnzipTaskXmlAttribute);

            //add the new element to the package document
            doc.AppendChild(taskElement);
        }
        #endregion

        #region CUSTOM Methods for getting path via Variable or Connectionmanager
        private string GetFilePathSource(ConnectionManager selectedConnectionManager)
        {
            if (selectedConnectionManager != null)
            {
                if (selectedConnectionManager.CreationName == "EXCEL")
                {
                    return selectedConnectionManager.Properties["ExcelFilePath"].GetValue(_selectedConnectionManagerSource).ToString();
                }
                else
                {
                    return selectedConnectionManager.ConnectionString;
                }
            }
            else
            {
                return "";
            }
        }

        private string GetFilePathSource(Variable selectedVariable)
        {
            if (selectedVariable != null)
            {
                return (String)_selectedVariableSource.Value;
            }
            else
            {
                return "";
            }
        }

        private Variable FindVariable(VariableDispenser variableDispenser, string variableID)
        {
            Variable tempVariable = null;
            if (variableDispenser.Contains(_selectedVariableIDSource))
            {
                Variables vars = null;
                variableDispenser.LockOneForRead(variableID, ref vars);

                if (vars != null)
                {
                    foreach (Variable var in vars)
                    {
                        if (var.ID == variableID)
                        {
                            tempVariable = var;
                        }
                    }
                }
                vars.Unlock();
            }
            return tempVariable;
        }

        private ConnectionManager FindConnectionManager(Connections connections, string connectionManagerID)
        {
            ConnectionManager tempConnManager = null;
            foreach (ConnectionManager connManager in connections)
            {
                if (connManager.ID == connectionManagerID)
                {
                    tempConnManager = connManager;
                }
            }
            return tempConnManager;
        }
        #endregion
    }
}
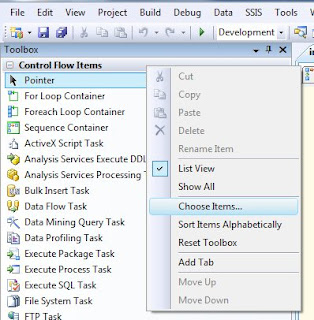
10) The ResultAfter building / deploying the solution, you need to close/reopen BIDS because the GAC is cached on startup. Now you can use your new task. For SSIS 2008 you need to right click the toolbox and click Choose Items. Then go to the Control Flow items and select your new task. For SSIS 2012 this is done automatically.
![]() |
| Your own custom SSIS task |
11) DownloadYou can download the complete Visual Studio 2010 example solutions:
SSIS 2008 versionSSIS 2012 versionNote: this is a very basic example. Use it as a base and check other examples like the one below.
More info:
MSDN,
Andy Leonard,
Matt Masson


 is different than the instance specified. To continue, add features to this instance with the same architecture.")


