Quantcast
Channel: Microsoft SQL Server Integration Services
Viewing all 149 articles
Browse latest View live

TSQL Merge for Slowly Changing Dimension or Persistent Staging Area

$
0
0
CaseWhat is a fast way to load a Slowly Changing Dimension or Persistent Staging Area in SSIS. When using a Data Flow Task for this, the process could become very slow when there are a lot of updates.

Solution
Instead of using the OLE DB Command for updating records you could load all those records to a temporary table and then use a batch update command to update all records in the target table with the values from the temporary table.

An even fancier way is by using the TSQL MERGE statement. This statement has one downside and that is that it can only update records when there is a match and not update the old record and insert a new record. You can overcome this by using the output of the MERGE statement.

The MERGE statement will update the existing record in the destination table, but it can output the old version of the updated record. You can then use this output to do an insert on the destination table.


First create a source and destination table for testing purposes:
-- Drop if exist
IF OBJECT_ID('dbo.Employees', 'U') IS NOT NULL
DROP TABLE dbo.Employees;

-- Create source table
CREATE TABLE [dbo].[Employees](
[EmployeeNumber] [varchar](5) NULL,
[FirstName] [varchar](50) NULL,
[LastName] [varchar](50) NULL,
[DateOfBirth] [date] NULL,
[Salary] [money] NULL
);

-- Insert test records in source
INSERT [dbo].[Employees] ([EmployeeNumber], [FirstName], [LastName], [DateOfBirth], [Salary]) VALUES (N'00001', N'John', N'Williams', CAST(N'1972-02-15' AS Date), 5100.00);
INSERT [dbo].[Employees] ([EmployeeNumber], [FirstName], [LastName], [DateOfBirth], [Salary]) VALUES (N'00002', N'Jane', N'Smith', CAST(N'1965-09-02' AS Date), 4900.00);
INSERT [dbo].[Employees] ([EmployeeNumber], [FirstName], [LastName], [DateOfBirth], [Salary]) VALUES (N'00003', N'Marc', N'Brown', CAST(N'1981-12-01' AS Date), 3300.00);
INSERT [dbo].[Employees] ([EmployeeNumber], [FirstName], [LastName], [DateOfBirth], [Salary]) VALUES (N'00004', N'David', N'Garcia', CAST(N'1975-01-01' AS Date), 3700.00);

-- Drop if exist
IF OBJECT_ID('dbo.DimEmployee', 'U') IS NOT NULL
DROP TABLE dbo.DimEmployee;

-- Create destination table
CREATE TABLE [dbo].[DimEmployee](
[EmployeeID] [int] IDENTITY(1,1) NOT NULL,
[EmployeeNumber] [varchar](5) NULL,
[FirstName] [varchar](50) NULL,
[LastName] [varchar](50) NULL,
[DateOfBirth] [date] NULL,
[Salary] [money] NULL,
[Active] [bit] NULL,
[DateFrom] [datetime] NULL,
[DateEnd] [datetime] NULL
);


The destination table is a Slowly Changing Dimension, but it could also be a Persistent Staging Area. It has the same columns as the source with a few extra columns:
  1. EmployeeID is the dimension id it's populated by the identity setting. You could skip this column for the Persistent Staging Area.
  2. Active: This is a Boolean to quickly filter all active records. It's a bit redundant, but also easy.
  3. DateFrom: This is the datetime to indicate the insertion of this record. It never changes.
  4. DateFrom: This is the datetime to indicate when this record was inactivated. I use NULL for active records, but you could also use a future date like '9999-31-12'

And now the MERGE script. Below I will try to describe each section that starts with a comment and number: /***** 1 *****/.
--Merge script
/***** 6b *****/
INSERT INTO DimEmployee
(EmployeeNumber
, FirstName
, LastName
, DateOfBirth
, Salary
, Active
, DateFrom
, DateEnd)
SELECT MergeOutput.EmployeeNumber
, MergeOutput.FirstName
, MergeOutput.LastName
, MergeOutput.DateOfBirth
, MergeOutput.Salary
, 0 -- InActivate the record
, MergeOutput.DateFrom -- Keep the old from date
, GETDATE() -- Close the record
FROM (
/***** 1 *****/
MERGE DimEmployee as T -- Target
USING Employees as S -- Source
ON T.EmployeeNumber = S.EmployeeNumber -- Compare key
AND T.Active = 1 -- Only compare open records
/***** 2 *****/
WHEN NOT MATCHED BY TARGET THEN -- Not found in destination
INSERT
( EmployeeNumber
, FirstName
, LastName
, DateOfBirth
, Salary
, Active
, DateFrom)
VALUES
( S.EmployeeNumber
, S.FirstName
, S.LastName
, S.DateOfBirth
, S.Salary
, 1 -- Activate the record
, GETDATE()) -- Open the record
/***** 3 *****/
WHEN NOT MATCHED BY SOURCE -- Not found in source
AND T.Active = 1 THEN -- Only compare open records
UPDATE
SET T.Active = 0 -- Inactivate record
, T.DateEnd = GETDATE() -- Close date
/***** 4 *****/
WHEN MATCHED -- Found in source and destination
AND T.Active = 1 -- Only compare open records
AND EXISTS (SELECT S.FirstName
, S.LastName
, S.DateOfBirth
, S.Salary
EXCEPT
SELECT T.FirstName
, T.LastName
, T.DateOfBirth
, T.Salary) THEN
UPDATE
SET T.FirstName = S.FirstName
, T.LastName = S.LastName
, T.DateOfBirth = S.DateOfBirth
, T.Salary = S.Salary
, T.Active = 1 -- Make record active
, T.DateFrom = GETDATE() -- Open record with current datetime
, T.DateEnd = null -- Keep record open
/***** 5 *****/
OUTPUT $action as MergeAction, Deleted.*, Inserted.Active as NewActiveCheck
/***** 6a *****/
) as MergeOutput WHERE MergeAction = 'UPDATE' and NewActiveCheck = 1;


  1. In this section you provide the name of the target and source table and which key to use to compare those records. I also added a filter on active to only compare open records. You could replace it by T.DateFrom is null.
  2. This section is for new records. Source records that are not found in the destination will be inserted with Active set to 1 (true), the FromDate set to now and the EndDate set to null.
  3. This section is for deleted records. Active destination records that are not found in the source are deactived and closed by setting the EndDate. Other columns remain unchanged.
  4. This secion is for active updating record with new values. To prevent unnecessary updates I have added EXISTS-EXCEPT part. This is  a very handy way to compare all (non key) columns for changes and above all it can even compare NULL values.
  5. This is the last part of the MERGE statement and it can output the old and new values of deletes, updates and insertions. In this case I'm interested in the old values of the changed records (Deleted.* or Deleted.column1, Deleted.column2, etc). I also output the Active column from the new record to filter inactivated records (deleted records from the source shouldn't be inserted again). The $active indicates whether this is an 'INSERT', 'UPDATE', or 'DELETE'.
  6. In 6a I filter on the action to only keep the old values of the updated records. In 6b I insert a new record with the old values of the changed records. I inactivate the new record and I set the EndDate to close the new record. Other columns remain unchanged.


Testing the script:
One update


Second test:
One update, one delete and one insert


I use this script primarily for the Persistent Staging Area. When you want to use it for an SCD you have to reload the facttable because the dimension ID changes. The fact pointing to ID 4 with David's old salary now points to the record with David's new salary.

The alternative script below could be a solution for that. Instead of comparing the key columns, I compare the CHECKSUM (or HASHBYTES) of all columns and remove the WHEN matched part (if the checksum matches, then we don't have to do anything). The benefit of this is that the dimension ID never changes. A second benefit is that you don't need to know the key columns. One downside is that CHECKSUM may not be unique and the HASHBYTES can only handle 8000bytes and can't compare NULL values. So the script below is NOT yet foolproof!!! Will work on that, but let me know if you have a solution.


--Alternative Merge script with checkum or hashbytes
/***** 6b *****/
INSERT INTO DimEmployee
( EmployeeNumber
, FirstName
, LastName
, DateOfBirth
, Salary
, Active
, DateFrom
, DateEnd)
SELECT MergeOutput.EmployeeNumber
, MergeOutput.FirstName
, MergeOutput.LastName
, MergeOutput.DateOfBirth
, MergeOutput.Salary
, 0 -- InActivate the record
, MergeOutput.DateFrom -- Keep the old from date
, GETDATE() -- Close the record
FROM (
/***** 1 *****/
MERGE DimEmployee as T -- Target
USING Employees as S -- Source
ON CHECKSUM(S.EmployeeNumber + '|' + S.FirstName + '|' + S.LastName + '|' + CAST(S.DateOfBirth as varchar(10)) + '|' + CAST(S.Salary as varchar(20))) =
CHECKSUM(T.EmployeeNumber + '|' + T.FirstName + '|' + T.LastName + '|' + CAST(T.DateOfBirth as varchar(10)) + '|' + CAST(T.Salary as varchar(20)))
--ON HASHBYTES('MD5 ', S.EmployeeNumber + '|' + S.FirstName + '|' + S.LastName + '|' + CAST(S.DateOfBirth as varchar(10)) + '|' + CAST(S.Salary as varchar(20))) =
-- HASHBYTES('MD5 ', T.EmployeeNumber + '|' + T.FirstName + '|' + T.LastName + '|' + CAST(T.DateOfBirth as varchar(10)) + '|' + CAST(T.Salary as varchar(20)))

AND T.Active = 1 -- Only compare open records
/***** 2 *****/
WHEN NOT MATCHED BY TARGET THEN -- Not found in destination
INSERT
( EmployeeNumber
, FirstName
, LastName
, DateOfBirth
, Salary
, Active
, DateFrom)
VALUES
( S.EmployeeNumber
, S.FirstName
, S.LastName
, S.DateOfBirth
, S.Salary
, 1 -- Activate the record
, GETDATE()) -- Open the record
/***** 3 *****/
WHEN NOT MATCHED BY SOURCE -- Not found in source
AND T.Active = 1 THEN -- Only compare open records
UPDATE
SET T.Active = 0 -- Inactivate record
, T.DateEnd = GETDATE() -- Close date
/***** 4 *****/
/***** REMOVED *****/
/***** 5 *****/
OUTPUT $action as MergeAction, Deleted.*, Inserted.Active as NewActiveCheck
/***** 6a *****/
) as MergeOutput WHERE MergeAction = 'UPDATE' and NewActiveCheck = 1;


Testing the script:
One update


Second test:
One update, one delete and one insert


TSQL Snippet: Split string in records

$
0
0
Case
I have a string in TSQL and I want to split it into separate values / records. How do I do that?

Solution
There are a lot of split examples available on the web, but I really like the XQuery solution for this. First you add a begin XML tag in front of your list and an closing XML tag at the end. Then you replace all separators by a closing and a begin tag. After that you have an XML string and you can use Xquery to split it. Below a little snippet as part of a stored procedure, but you could also create a function for it or just use the three lines in your own code:

-- Snippet
CREATE PROCEDURE [dbo].[SplitList] (
@List VARCHAR(255)
, @Separator VARCHAR(1)
)
as
BEGIN
DECLARE @Split XML;
SET @Split = CAST('<t>' + REPLACE(@List, @Separator, '</t><t>') + '</t>' as XML)
SELECT Col.value('.', 'VARCHAR(255)') as ListValue FROM @Split.nodes('t') as xmlData(Col) order by 1
END


Note: your string / list can't contain forbidden XML characters like <, > and &. You could use additional REPLACE functions to prevent errors: REPLACE(@List,"<", "&lt;")
split snippet

Getting error column name in SSIS 2016

$
0
0
Case
In SQL 2016 CTP 2.3 Microsoft introduced a new simple way with to get the name of the column causing the error with some .NET code in a Script Component. In the final release this code doesn't work.

Solution
Not sure why, but they changed the code. Instead of one line we now need two lines. Below the complete example with the new code.


1) Data Flow Task
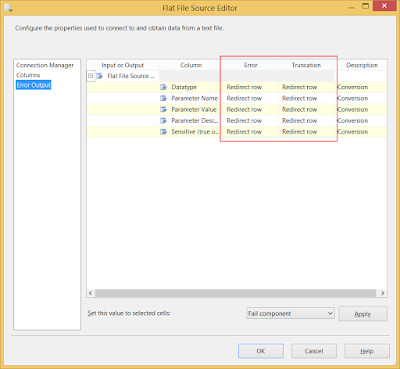
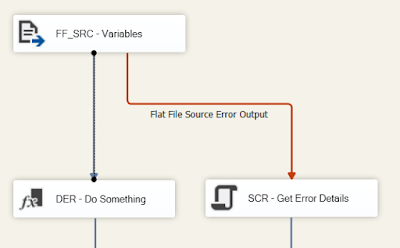
For this example we have a Flat File Source and to throw an error there is a column in the textfile with a too large value causing a truncation error. To catch the error details we redirect all errors of the Flat File Source to an Error Output. You can find these settings by editing the Flat File Source component or by connecting its red output to an other transformation.

Redirect errors to Error Output


2) Add Script Component
The Error Output is redirected to a Script Component (type transformation). It should look something like this below. Give it a suitable name like "SCR- Get Error Details".
Add Script Component Transformation


3) Input Columns
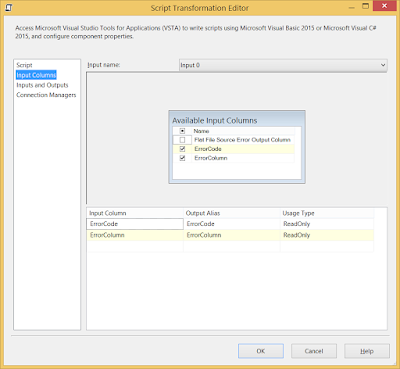
Edit the Script Components and go to the Input Columns page and select the ErrorCode (for getting an error description) and the ErrorColumn (for getting a column name) as ReadOnly input columns.
Input Columns


4) Output Columns
Create two output columns with the Data Type String (DT_STR). For this example I used 255 for the length, but that could probably be a little smaller. The names are ErrorDescription and ErrorColumnName.
Output Columns


5) The Code
Now go to the first page to choose your Scripting Language and then click on the Edit Script button to open the VSTA environment. Then locate the Input0_ProcessInputRow method at the bottom and add the following three lines of code to it.
// C# Code
public override void Input0_ProcessInputRow(Input0Buffer Row)
{
// Getting description already worked in previous versions of SSIS
Row.ErrorDescription = this.ComponentMetaData.GetErrorDescription(Row.ErrorCode);

// componentMetaData (starting with a lowercase "c") is just a name.
// You can change that name if you like, but also change it in the
// second row.
IDTSComponentMetaData130 componentMetaData = this.ComponentMetaData as IDTSComponentMetaData130;
Row.ErrorColumnName = componentMetaData.GetIdentificationStringByID(Row.ErrorColumn);

And VB.NET code

' VB Code
Public Overrides Sub Input0_ProcessInputRow(ByVal Row As Input0Buffer)
' Getting description already worked in previous versions of SSIS
Row.ErrorDescription = Me.ComponentMetaData.GetErrorDescription(Row.ErrorCode)

' componentMetaData (starting with a lowercase "c") Is just a name.
' You can change that name if you Like, but also change it in the
' second row.
Dim componentMetaData As IDTSComponentMetaData130 = TryCast(Me.ComponentMetaData, IDTSComponentMetaData130)
Row.ErrorColumnName = componentMetaData.GetIdentificationStringByID(Row.ErrorColumn)
End Sub


6) Testing
Close the VSTA environment to save the code and press OK the close editor. Now add a Data Viewer behind the Script Component Transformation to see the results
Error Description and ColumnName

SSIS Data Streaming Destination

$
0
0
Case
What can you do with the Data Streaming Destination in SSIS and how does it work? It only has an 'Advanced' editor with very little explanation.
Editor Data Streaming Destination


Solution
You probably never used or even saw this destination component before because it was a separate download in SSIS 2012 and for SSIS 2014 I couldn't even find the download page. But now for SSIS 2016 it's one of the standard toolbox items. And even now it's in the wrong toolbox section: you will find it under Common instead of Other Destinations. That can be easily solved by moving it the appropriate section of the SSIS Toolbox.
Moving Data Streaming Destination


The Data Streaming Destination allows you to query its output via a linked server connectionon the SSISDB. If certain sources or transformations are very hard with standard TSQL then you could solve it in an SSIS package. After that you can query its output with TSQL. Yes I know almost every thing is possible with TSQL when you for example use CLR stored procedures, but SSIS is just a visual alternative.


1) Data Flow Task
For this example I will use a package with one very basic Data Flow Task with a Flat File Source Component, a Derived Column and the Data Streaming Destination.
Simple Data Flow with Data Streaming Destination


2) Data Streaming Destination
When you add the Data Streaming Destination and edit it, you will get the Advanced Editor. It only allows you to choose the input columns and you can change the name of an automatically generated identity column (see previous screenshot). For this example I pass through all columns and leave the id column name unchanged.
Pass through all columns


3) Saving and deploying
Now I need to deploy the package(s) to the SSIS Catalog. You could add parameters and create an SSIS Catalog environment to fill them on package start. I will skip that for this basic example.
Deploying packages to SSIS Catalog


4) Data Feed Publishing Wizard
Now start the SQL Server Integration Service Data Feed Publishing Wizard from the start menu and choose which package to execute in your view. You also need to provide the name and location of your view. For Linked Server validation errors go to step 4b.
(C:\Program Files (x86)\Microsoft SQL Server\130\DTS\Binn\ISDataFeedPublishingWizard.exe)
SSIS Data Feed Publishing Wizard


4b) Error: The Allow Inprocess option for the OLE DB Provider is not enabled.
When you get a Linked Server error during validation you need to enable "Allow inprocess".
The Allow Inprocess option for
the OLE DB Provider is not enabled.


Go to SSMS and connect to your server where the SSISDB is running. Expand Server Objects, Linked Servers, Providers and then right click SSISOLEDB and choose Properties. In the Provider Options enable "Allow inprocess" and click OK. After that Rerun volition in the Wizard.
Provider Options, Enable "Allow inprocess"


4c) Error: The are more than one Data Streaming Destination components in the package and only one of them can pass data to a SQL Server database
The error says it all: You can only have one Data Streaming Destination! Remove the others first and rerun validation.
The are more than one Data Streaming Destination components
in the package and only one of them can pass data
to a SQL Server database


5) Testing the view
Go to SSMS and execute your newly created view. You probably have to test you patience a little bit because it's not very fast. It first has to execute the package which takes a couple of seconds. I haven't found a good purpose for a real-life situation yet, but may be you can use it to create a (nearly) real time data feed from a webservice for your PowerBI report. Or..... let me know in the comments where you used it for.
Querying the new view 


If you don't want to use the wizard you could just do it with TSQL:

USE [SSISJoost]
GO

SET ANSI_NULLS ON
GO

SET QUOTED_IDENTIFIER ON
GO

CREATE VIEW [dbo].[MyDataStream] AS SELECT * FROM OPENQUERY([Default Linked Server for Integration Services], N'Folder=DataStream;Project=DataStream;Package=DataStream.dtsx')
GO

SSIS 2016 Feature Pack for Azure

$
0
0
A while ago I did a post on the SSIS (2012/2014) Feature Pack for Azure. Now a new version has been released for SSIS 2016 and they made some minor changes.

Download
If you start SSDT 2015 you will see a greyed out Azure toolbox section. If you select it you will find a download link. Download and install both the 32bit and the 64bit version.
Download link in the toolbox


Installation
Installation (of both 32 and 64bit) is very simple Next, Accept, Next, Install and Finish.
Feature Pack for Azure Setup


New toolbox items


New features: 1 compression
The Azure Blob Source and Destination now support (de)compression (GZIP/DEFLATE/BZIP2), but the upload and download task don't.
Azure Blob Source

Azure Blob Destination


New features: 2 Storage Connection Manager
The new Storage Connection Manager now also supports the new Storage Account (and also the Classic Storage Account). The old storage account uses the REST API and the new storage account uses the Azure Resource Manager (ARM) API, which is wrapped in PowerShell. Nearly the same, but managed differently. The new Storage Connection Manager also has an extra option to choose an other domain (Azure moon cake).
New Storage Connection Manager
Old Storage Connection Manager


Unfortunately still no 'Azure File System Task' (please upvote).


All download links:
2012: https://www.microsoft.com/en-us/download/details.aspx?id=47367
2014: https://www.microsoft.com/en-us/download/details.aspx?id=47366
2016: https://www.microsoft.com/en-us/download/details.aspx?id=49492

Using SAS as a source in BIML

$
0
0
Case
I recently created packages with a SAS source, but now I want to use the same SAS source in my BIML Script. But I'm getting an error that the Local Provider doesn't support SQL. How can I solve this?
Error 0 : Node OLE_SRC - DIM_TIJD:
Could not execute Query on Connection PROFIT1:
SELECT * FROM DIM_TIJD
The Local Provider does not currently support SQL processing.


Solution
There is NO easy solution for this. The provider doesn't support SQL Queries and that's what the BIML engine does first to get the metadata from the source table. Luckily there is a search-and-replace workaround. A lot of extra work, but still much easier then creating all packages by hand!

1) mirror database in SQL server
I used the metadata from SAS to get all tables and columns which I then used to create (empty/dummy) SQL Server tables with the same metadata as SAS (The datatype is either varchar of float). The tool to get the SAS metadata is SAS Enterprise Guide. It lets you export the metadata to for example Excel and then you can use that to create the dummy tables.
A little script created by a SAS developer to get metadata


Metadata export example in Excel


2) BIML
Instead of the SAS OleDB connection manager I used a temporary SQL Server OleDB connection manager, but I also kept the SAS OleDB connection manager in my BIML code and gave both the same name with a different number at the end (easier to replace later on).
BIML Connection Managers


Because the SAS OleDB connection manager isn't used in the BIML code it won't be created by the BIML engine. To enforce that, I used a second connections tag between </Tasks> and </Package>. It also lets me give them nearly the same GUID (easier to replace later on).
BIML Force create connection managers


The end result of the BIML script:
  • A whole bunch of packages that use the SQL Server database as a source (instead of SAS DB)
  • Two connection managers with nearly the same name and GUID (SAS OleDB and SQL OleDB)

3) Search and Replace
Now you must open all generated packages by using View Code (instead of View Designer). When all packages are opened you can use Search and Replace to change the name and GUID in all packages. Make sure you don't replace too much that could damage your generated packages. Then save all changes and close all packages. Next open your packages in the designer to view the result.

Tip: you can use also the same metadata (and a big if-then-else construction) to create a derived column in BIML that casts all float-columns to the correct datatypes (int, date, decimal, etc.).

Using SAS as a source in SSIS

$
0
0
Case
I want to extract data from a SAS database file (*.sas7bdat). How do I do that in SSIS?

Solution
This is possible but not out of the box. You need to install an extra provider to accomplish  this.

1) Download SAS Provider
First you need to download and install the SAS Providers for OLE DB. There are multiple versions make sure to download the correct version (otherwise you get error messages like "This application does not support your platform"). You only need the select SAS Providers for OLE DB.
Install SAS Providers for OLE DB


2) Setup OLE DB Connection Manager
After installation the new provider will be available in OLE DB Connection Manager editor. Make sure to choose "SAS Local Data Provider X.X". This is the provider that can read SAS database files (*.sas7bdat).
SAS Local Data Provider 9.3


Second import step in the setup is to select the folder where the sas7bdat files are located. Don't select a file! All files will appear as tables in the OLE DB Source component. In my case I could leave the User name and Password fields empty because I already had access to the folder (but I'm not an SAS expert).
Fill in folderpath in Server or file name field


3) Setup OLE DB Source Component
Now you can use a regular OLE DB Source Component to extract data from SAS. However there are two concerns. When you select a table and close the editor you will get a warning that there is something wrong with the code page.
Cannot retrieve the column code page info from the OLE DB provider.
  If the component supports the "DefaultCodePage" property, the code page
from that property will be used.  Change the value of the property if the
current string code page values are incorrect.  If the component does not
support the property, the code page from the component's locale ID will
be used.


After clicking OK there will be a warning icon in the OLE DB Source Component which you can remove by setting the "AlwaysUseDefaultCodePage" property on true.
Before and after changing AlwaysUseDefaultCodePage


The second concern is more annoying: all datatypes will be DT_SRT (ansi string) or DT_R8 (float). You cannot change this and you need to add a data conversion.
Date(times) are also numbers: dates will be a number of days after January 1 1960 and datetimes will be the number of seconds after January 1 1960 and any decimals are used for milliseconds. A Derived Column expression for date could look something like:
DATEADD("DD", (DT_I4)[mydatecolumn], (DT_DATE)"1960-01-01")
All string or float


Tip: you can also use BIML to create SSIS packages with a SAS7BDAT source.

SSIS Appetizer: Cache Transformation File is Raw File

$
0
0
SSIS Appetizer
I'm not sure I have a purpose for this, but did you know that you can use the cache file of the Cache Transformation (introduced in SSIS 2008) as a source file in the Raw File Source.

Demo
For this demo I use two Data Flow Tasks. The first creates the cache file and the second one uses it as a source.
Two Data Flow Task


1) Create Cache
The first Data Flow has a random source (a flat file in this case) and a Cache Transformation named "CTR - Create Cache"  as a destination. When you create the Cache Connection Manager, make sure to check "Use file cache" to provide a file path for the cache file. Copy the path for the next step.
The Cache Transformation and Connection Manager


2) Read Cache
The second Data Flow Task uses a Raw File Source. In the editor you can specify the location of the Raw File. Paste the path from the Cache Connection Manager (a .caw file). For demonstration purposes I added a dummy Derived Column behind it with a Data Viewer on the path between them. Now run the package a see the result. You will get some hash columns 'for free'.
Raw File Source


Please let me know in the comments if you found a good purpose for this.

Note: you can't use a raw file as a cache file unless you're able to add the extra hash columns as well.

Using PowerShell for SSIS

$
0
0
Recently I presented an SSIS & PowerShell session at the SQL Serverdays in Schelle, Belgium and SQL Saturday in Utrecht, The Netherlands. You can download the PowerPoints:


And here is a list of some of the scripts used in the demo's:


And some atmospheric impressions:

The venue in Schelle near Antwerp


Look at me pointing :-)


The venue in Utrecht


Look at me again :-)


And some atmospheric impressions on youtube in Dutch

Using PowerShell to create SQL Agent Job for SSIS

$
0
0
Case
I used PowerShell to deploy my SSIS project to the Catalog. Can I also automatically create a SQL Server Agent job with an SSIS jobstep?
SQL Agent Job for SSIS package


Solution
Yes, almost every Microsoft product supports PowerShell and SQL Server Agent is no exception. Only the SSIS specific part of the jobstep seems to be a little more difficult to handle. So for this example I first created a SQL Server Agent job(step) for an SSIS package in SSMS manually and then scripted it to see the jobstep command. This command is a long string with all SSIS specific information like the packagepath, enviroment and parameters. Below you see parts of the generated TSQL Script. We are interested in the part behind @command= in row 12:
/****** Object:  Step [PowerShell and SSIS - Master.dtsx]    Script Date: 25-10-2016 22:30:35 ******/
EXEC @ReturnCode = msdb.dbo.sp_add_jobstep @job_id=@jobId, @step_name=N'PowerShell and SSIS - Master.dtsx',
@step_id=1,
@cmdexec_success_code=0,
@on_success_action=1,
@on_success_step_id=0,
@on_fail_action=2,
@on_fail_step_id=0,
@retry_attempts=0,
@retry_interval=0,
@os_run_priority=0, @subsystem=N'SSIS',
@command=N'/ISSERVER "\"\SSISDB\Finance\PowerShell and SSIS\Master.dtsx\"" /SERVER "\"MyServer\MSSQLSERVER2016\"" /Par "\"$ServerOption::LOGGING_LEVEL(Int16)\"";1 /Par "\"$ServerOption::SYNCHRONIZED(Boolean)\"";True /CALLERINFO SQLAGENT /REPORTING E',
@database_name=N'MyServer\MSSQLSERVER2016',
@flags=0


This command string is used in the PowerShell script below, but hardcoded parts are replaced with values from the PowerShell parameters (see row 66). The rest of the script is more straightforward and easily to adjust or extend. If you're not sure about how to adjust the script then first take a look at the T-SQL script which has similar steps and with the same properties to set.


#PowerShell SSIS JobStep
################################
########## PARAMETERS ##########
################################
# Destination
$SsisServer = "MyServer\MSSQLSERVER2016"
$FolderName = "Finance"
$ProjectName = "PowerShell and SSIS"

# Job
$JobName = "Load DWH"
$MasterPackage = "Master.dtsx"
$JobStartTime = New-TimeSpan -hours 6 -minutes 30

clear
Write-Host "========================================================================================="
Write-Host "== Used parameters =="
Write-Host "========================================================================================="
Write-Host "SSIS Server : " $SsisServer
Write-Host "FolderName : " $FolderName
Write-Host "ProjectName : " $ProjectName
Write-Host "Job name : " $JobName
Write-Host "MasterPackage : " $MasterPackage
Write-Host "ScheduleTime : " $JobStartTime
Write-Host "========================================================================================="
Write-Host ""


# Reference SMO assembly and connect to the SQL Sever Instance
# Check the number in the path which is different for each version
Add-Type -Path 'C:\Program Files\Microsoft SQL Server\130\SDK\Assemblies\Microsoft.SqlServer.Smo.dll'
$SQLSvr = New-Object -TypeName Microsoft.SQLServer.Management.Smo.Server($SsisServer)

# Check if job already exists. Then fail, rename or drop
$SQLJob = $SQLSvr.JobServer.Jobs[$JobName]
if ($SQLJob)
{
# Use one of these 3 options to handle existing jobs

# Fail:
#Throw [System.Exception] "Job with name '$JobName' already exists."

# Rename:
Write-Host "Job with name '$JobName' found, renaming and disabling it"
$SQLJob.Rename($SQLJob.Name +"_OLD_" + (Get-Date -f MM-dd-yyyy_HH_mm_ss))
$SQLJob.IsEnabled = $false
$SQLJob.Alter()

# Drop:
#Write-Host "Job with name $JobName found, removing it"
#$SQLJob.Drop()
}


#Create new (empty) job
$SQLJob = New-Object -TypeName Microsoft.SqlServer.Management.SMO.Agent.Job -argumentlist $SQLSvr.JobServer, $JobName
$SQLJob.OwnerLoginName = "SA"
$SQLJob.Create()
Write-Host "Job '$JobName' created"


# Command of jobstep
# This string is copied from T-SQL, by scripting a job(step) in SSMS
# Then replace the hardcode strings with [NAME] to replace them with variables
$Command = @'
/ISSERVER "\"\SSISDB\[FOLDER]\[PROJECT]\[PACKAGE]\"" /SERVER "\"[INSTANCE]\"" /Par "\"$ServerOption::LOGGING_LEVEL(Int16)\"";1 /Par "\"$ServerOption::SYNCHRONIZED(Boolean)\"";True /CALLERINFO SQLAGENT /REPORTING E
'@
$Command = $Command.Replace("[FOLDER]", $FolderName)
$Command = $Command.Replace("[PROJECT]", $ProjectName)
$Command = $Command.Replace("[PACKAGE]", $MasterPackage)
$Command = $Command.Replace("[INSTANCE]", $SsisServer)


# Create new SSIS job step with command from previous block
$SQLJobStep = New-Object -TypeName Microsoft.SqlServer.Management.SMO.Agent.JobStep -argumentlist $SQLJob, "$ProjectName - $MasterPackage"
$SQLJobStep.OnSuccessAction = [Microsoft.SqlServer.Management.Smo.Agent.StepCompletionAction]::QuitWithSuccess
$SQLJobStep.OnFailAction = [Microsoft.SqlServer.Management.Smo.Agent.StepCompletionAction]::QuitWithFailure
$SQLJobStep.SubSystem = "SSIS"
$SQLJobStep.DatabaseName = $SsisServer
$SQLJobStep.Command = $Command
$SQLJobStep.Create()
Write-Host "Jobstep $SQLJobStep created"


# Create a daily schedule
$SQLJobSchedule = New-Object -TypeName Microsoft.SqlServer.Management.Smo.Agent.JobSchedule -ArgumentList $SQLJob, "Daily $JobStartTime"
$SQLJobSchedule.IsEnabled = $true
$SQLJobSchedule.FrequencyTypes = [Microsoft.SqlServer.Management.SMO.Agent.FrequencyTypes]::Daily
$SQLJobSchedule.FrequencyInterval = 1 # Recurs Every Day
$SQLJobSchedule.ActiveStartDate = Get-Date
$SQLJobSchedule.ActiveStartTimeofDay = $JobStartTime
$SQLJobSchedule.Create()
Write-Host "Jobschedule $SQLJobSchedule created"


# Apply to target server which can only be done after the job is created
$SQLJob.ApplyToTargetServer("(local)")
$SQLJob.Alter()
Write-Host "Job '$JobName' saved"


You could combine this with the deploy script to handle the complete SSIS deployment in one script.

SSIS Naming conventions

$
0
0
In 2006 Jamie Thomson came up with naming conventions for SSIS tasks and data flow components. These naming conventions make your packages and logs more readable. Five SQL Server versions and a decade later a couple of tasks and components were deprecated, but there were also a lot of new tasks and components introduced by Microsoft.

Together with Koen Verbeeck (B|T) and André Kamman (B|T) we extended the existing list with almost 40 tasks/components and created a PowerShell Script that should make it easier to check/force the naming conventions. This PowerShell script will soon be published at GitHub.

PowerShell Naming Conventions Checker


Task namePrefixTypeNew
For Loop ContainerFLCContainer
Foreach Loop ContainerFELCContainer
Sequence ContainerSEQCContainer
ActiveX ScriptAXSTask
Analysis Services Execute DDL TaskASETask
Analysis Services Processing TaskASPTask
Azure Blob Download TaskADTTask*
Azure Blob Upload TaskAUTTask*
Azure HDInsight Create Cluster TaskACCTTask*
Azure HDInsight Delete Cluster TaskACDTTask*
Azure HDInsight Hive TaskAHTTask*
Azure HDInsight Pig TaskAPTTask*
Back Up Database TaskBACKUPTask*
Bulk Insert TaskBLKTask
CDC Control TaskCDCTask*
Check Database Integrity TaskCHECKDBTask*
Data Flow TaskDFTTask
Data Mining Query TaskDMQTask
Data Profiling TaskDPTTask*
Execute Package TaskEPTTask
Execute Process TaskEPRTask
Execute SQL Server Agent Job TaskAGENTTask*
Execute SQL TaskSQLTask
Execute T-SQL Statement TaskTSQLTask*
Expression TaskEXPRTask
File System TaskFSYSTask
FTP TaskFTPTask
Hadoop File System TaskHFSYSTask*
Hadoop Hive TaskHIVETask*
Hadoop Pig TaskPIGTask*
History Cleanup TaskHISTCTTask*
Maintenance Cleanup TaskMAINCTTask*
Message Queue TaskMSMQTask
Notify Operator TaskNOTTask*
Rebuild Index TaskREBITTask*
Reorganize Index TaskREOITTask*
Script TaskSCRTask
Send Mail TaskSMTTask
Shrink Database TaskSHRINKDBTask*
Transfer Database TaskTDBTask
Transfer Error Messages TaskTEMTask
Transfer Jobs TaskTJTTask
Transfer Logins TaskTLTTask
Transfer Master Stored Procedures TaskTSPTask
Transfer SQL Server Objects TaskTSOTask
Update Statistics TaskSTATTask*
Web Service TaskWSTTask
WMI Data Reader TaskWMIDTask
WMI Event Watcher TaskWMIETask
XML TaskXMLTask
Transformation namePrefixTypeNew
ADO NET SourceADO_SRCSource*
Azure Blob SourceAB_SRCSource*
CDC SourceCDC_SRCSource*
DataReader SourceDR_SRCSource
Excel SourceEX_SRCSource
Flat File SourceFF_SRCSource
HDFS File SourceHDFS_SRCSource*
OData SourceODATA_SRCSource*
ODBC SourceODBC_SRCSource*
OLE DB SourceOLE_SRCSource
Raw File SourceRF_SRCSource
SharePoint List SourceSPL_SRCSource
XML SourceXML_SRCSource
AggregateAGGTransformation
AuditAUDTransformation
Balanced Data DistributorBDDTransformation*
Cache TransformCCHTransformation*
CDC SplitterCDCSTransformation*
Character MapCHMTransformation
Conditional SplitCSPLTransformation
Copy ColumnCPYCTransformation
Data ConversionDCNVTransformation
Data Mining QueryDMQTransformation
Derived ColumnDERTransformation
DQS CleansingDQSCTransformation*
Export ColumnEXPCTransformation
Fuzzy GroupingFZGTransformation
Fuzzy LookupFZLTransformation
Import ColumnIMPCTransformation
LookupLKPTransformation
MergeMRGTransformation
Merge JoinMRGJTransformation
MulticastMLTTransformation
OLE DB CommandCMDTransformation
Percentage SamplingPSMPTransformation
PivotPVTTransformation
Row CountCNTTransformation
Row SamplingRSMPTransformation
Script ComponentSCRTransformation
Slowly Changing DimensionSCDTransformation
SortSRTTransformation
Term ExtractionTEXTransformation
Term LookupTELTransformation
Union AllALLTransformation
UnpivotUPVTTransformation
ADO NET DestinationADO_DSTDestination*
Azure Blob DestinationAB_DSTDestination*
Data Mining Model TrainingDMMT_DSTDestination
Data Streaming DestinationDS_DSTDestination*
DataReaderDestDR_DSTDestination
Dimension ProcessingDP_DSTDestination
Excel DestinationEX_DSTDestination
Flat File DestinationFF_DSTDestination
HDFS File DestinationHDFS_DSTDestination*
ODBC DestinationODBC_DSTDestination*
OLE DB DestinationOLE_DSTDestination
Partition ProcessingPP_DSTDestination
Raw File DestinationRF_DSTDestination
Recordset DestinationRS_DSTDestination
SharePoint List DestinationSPL_DSTDestination
SQL Server Compact DestinationSSC_DSTDestination*
SQL Server DestinationSS_DSTDestination


Example of the prefixes

Setup SSIS Scale Out

$
0
0
Case
SQL VNext has a new Scale Out function. How does it work and how do you install and configure that?

Solution
The new Scale Out option in SSIS VNEXT gives you the ability to execute multiple packages distributed to multiple worker machines. You can select multiple packages on the master that will be executed in parallel by one or more worker machines.

Machine setup
To make sense of a Scale Out you of course need multiple machines. We need a master machine and one or more worker machines. Because the master distributes the executions and doesn't execute packages it self, you may want to consider installing a worker on the same machine as the master to make use of its resources. The worker machines only have a worker installed. A SQL Server engine installation is not necessary on a worker.
Option 1: Master only distributes executions


Option 2: Master also executes packages itself


For this example I will use option 1 with a master and two separate workers on three HyperV machines. All machines are identical with Windows Server 2012 R2 with all updates installed.
HyperV Machines


Download
Before installing your first you need to download SQL Server VNEXT and the associated SSMS and SSDT.

Installation steps:
  1. Install SQL Server VNEXT on master
  2. Configure firewall on master
  3. Copy master certificate to workers
  4. Install SQL Server VNEXT on workers
  5. Copy worker certificates to master
  6. Install SSMS VNEXT to add Catalog on master
  7. Install worker certificates on master
  8. Enable scale out workers on master

Installation step 1: install SQL Server VNEXT on master
Install SQL Server VNEXT on the 'Master' machine called "SQLVNEXT_M". Below the most important steps of the installation. At the bottom all screens are shown in a movie.
We need the Database Engine to store the SSISDB

We need SSIS and the Scale Out Master

SQL Server Authentication mode is required on the SSISDB

Choose port 8391 and create a new SSL certificate

All steps


Installation step 2: configure firewall on master
Open a firewall port on the Scale Out Master. We need at least an inbound rule for port 8391 supplied as EndPoint in the previous step, but a complete list of all SQL Server ports can be found here.


Installation step 3: copy master certificate to workers
We created a new certificate during installation of the Scale Out Master. You can find it in <drive>:\Program Files\Microsoft SQL Server\140\DTS\Binn. We need that certificate during installation of the Scale Out Workers. So copy it to the worker machines.
Copy SSISScaleOutMaster.cer to worker


Copy SSISScaleOutMaster.cer to worker


Installation step 4: install SQL Server VNEXT on workers
Install SQL Server VNEXT on the 'Worker' machines called "SQLVNEXT_W1" and "SQLVNEXT_W2". Below the most important steps of the installation. At the bottom all screens are shown in a movie.
Only select SSIS and Scale Out Worker (no engine needed)

Add an EndPoint like https://SQLVNEXT_M:8391. This is the name of the
Scale Out Master machine and the port chosen during the installation of the
Scale Out Master.
The certificate is the one you copied from the Scale Out Master
in one of the previous steps.

All steps


Installation step 5: copy worker certificates to master
During installation of the Scale Out Worker machines, certificates where created which we need register on the machine with the Scale Out Master. With these certificates the Scale Out Master can authenticate the Scale Out Workers. You can find SSISScaleOutWorker.cer in <drive>:\Program Files\Microsoft SQL Server\140\DTS\Binn(repeat this for all workers).
Copy SSISScaleOutWorker.cer to master


Copy SSISScaleOutWorker.cer to master


Installation step 6: install SSMS VNEXT to add Catalog on master
Now we need to add a catalog to the master. To do this you need to install SSMS VNEXT first. For this demo situation I installed SSMS VNEXT on the master machine.
Install SSMS VNEXT


Add catalog as you normally do, but notice the extra option:
Enable this server as SSIS scale out master


Add catalog


Installation step 7: install worker certificates on master
Now we need to install all Scale Out Worker Certificates on the Scale Out Master machine. They should be stored in the Trusted Root Certification Authorities. Repeat the steps below for all Worker Certificates.

Store certificates in Trusted Root Certification Authorities

All Steps


Installation step 8: enable scale out workers on master
Make sure the services SSISScaleOutWorker140 on the Worker machines are started and SSISScaleOutMaster140 on the master. Then start SSMS and connect to the SQL Server instance on the master and execute the following query:
-- Get Worker info
SELECT * FROM [SSISDB].[catalog].[worker_agents]

It could take a few minutes before the worker machines are registered. Once that happens the query should return records. Use the values from the WorkerIdAgentId column in the next Stored Procedure Call to enable the Scale Out Workers
-- Enable Workers
EXEC [SSISDB].[catalog].[enable_worker_agent] 'F5BA7B83-D8FC-49D2-8896-95C0F0725562' -- SQLVNEXT_W1
EXEC [SSISDB].[catalog].[enable_worker_agent] 'FC0B9E86-8BB3-4A3D-B3EB-5A29DE1CE9BE' -- SQLVNEXT_W2
Enable Scale Out Workers


Now you're ready to deploy your first project and execute packages with the new Scale Out function. Also see the Microsoft walkthrough for the scale out setup.

Conclusion
The Master Worker setup is a great way to distribute package executions over multiple servers. When you will choose for upgrading your existing SSIS server with more memory and more cores above the new master-worker setup, probably depends on the licensing model. But when you already maxed out the hardware of your current SSIS server, then this new master-worker setup is an easy way to upgrade.
And what about a future Scale Out to Azure? If a weekly, monthly or quarterly run is taking to much time or one of your worker servers is down (for maintenance?).


Deployment bug SSIS VNEXT missing reference

$
0
0
Case
When deploying a project from SSDT VNEXT (SQL Server Data Tools 17.0 RC1) I get an error.
Could not load file or assembly
'Microsoft.SqlServer.Management.IntegrationServicesEnum, Culture=neutral,
PublicKeyToken=89845dcd8080cc91' or one of its dependencies.
The system cannot find the file specified. (mscorlib)


Solution
SSDT 17.0 RC1 still got some bugs, for real projects you should use SSDT 16.5 But if you want to discover for example the Scale Out function or Support for Microsoft Dynamics Online Resources of SQL VNEXT then have to use this version.

Three solutions (in order of recommendation):
  1. Since this bug only occurs in SSDT, you could deploy outside SSDT with PowerShell of by just double clicking the ISPAC file. Then this error won't occur.
  2. It's a known issue. Just wait for the next release of SSDT (early 2017).
  3. Or add the missing reference to <drive>:\Program Files (x86)\Microsoft Visual Studio 14.0\Common7\IDE\devenv.exe.config and restart SSDT (at your own risk of course)
Add missing reference


<dependentAssembly>
<assemblyIdentity name="Microsoft.SqlServer.Management.IntegrationServicesEnum" publicKeyToken="89845dcd8080cc91" culture="neutral"/>
<bindingRedirect oldVersion="13.0.0.0-14.100.0.0" newVersion="13.0.0.0"/>
</dependentAssembly>
Solved

Execute packages in Scale Out

$
0
0
Case
How do I execute a package with the new Scale Out function? I don't see any options when executing a package.
Find the Scale Out options


Solution
The new Scale Out execution is not (yet) integrated in the standard package execution window. And the Package Execution Task has not changed. Therefore it will always execute the package on the same worker as the parent package. Both will probably change within a couple CTP releases.

Catalog
If you right click on SSISDB within the catalog then you will see the new context menu item "Execute in Scale Out..."
Execute in Scale Out...


Next you can choose which packages to execute and on which worker servers.
Execute in Scale Out


After hitting the OK button no reports are shown like in the regular execution, but you can find the reports in the context menu of the Catalog.
No open report option


The Machine property show which worker was used


Conclusions
Nice first version of the Scale Out. Hopefully the next CTP contains a new version of the Execute Package Task and an integration of the regular execution and scale out execution. Please try it out and let me (or Microsoft) know what you think about it.

Some considerations, because the worker services uses a local system account you might want to consider changing that to a domain account or use other options like a proxy or a database user. Other concerns are the firewall if you're using a local database on the master and local paths (d:\myfiles\) on the master won't work either.
NT Service\SSISScaleOutWorker140

SSIS Appetizer: import numerics with other regional settings

$
0
0
Case
I have a CSV file with numeric values that use a dot "." as decimal separator instead of the comma "," we use locally. When I try to import it in SSIS with a Flat File Source it gives me an error. I don't want to/can't change the regional settings on the server. How do I import this flat file without errors?
The value could not be converted because of a potential loss of data
10.5 should be 10,5 (or vice versa)


Error: 0xC02020A1 at DFT - Process Data, FF_SRC - myCsvFile [2]: Data conversion failed. The data conversion for column "myColumn" returned status value 2 and status text "The value could not be converted because of a potential loss of data.".
Error: 0xC0209029 at DFT - Process Data, FF_SRC - myCsvFile [2]: SSIS Error Code DTS_E_INDUCEDTRANSFORMFAILUREONERROR.  The "FF_SRC - myCsvFile.Outputs[Flat File Source Output].Columns[myColumn]" failed because error code 0xC0209084 occurred, and the error row disposition on "FF_SRC - myCsvFile.Outputs[Flat File Source Output].Columns[myColumn]" specifies failure on error. An error occurred on the specified object of the specified component.  There may be error messages posted before this with more information about the failure.
Error: 0xC0202092 at DFT - Process Data, FF_SRC - myCsvFile [2]: An error occurred while processing file "D:\myFolder\2016-12-27.csv" on data row 2.
Error: 0xC0047038 at DFT - Process Data, SSIS.Pipeline: SSIS Error Code DTS_E_PRIMEOUTPUTFAILED.  The PrimeOutput method on FF_SRC - myCsvFile returned error code 0xC0202092.  The component returned a failure code when the pipeline engine called PrimeOutput(). The meaning of the failure code is defined by the component, but the error is fatal and the pipeline stopped executing.  There may be error messages posted before this with more information about the failure.


Solution
You can change the LocaleID of the connection manager to import this file. Right click the connection managers and choose Properties...
Go to properties of flat file connection manager


Then locate the LocaleID property and change it to English (United States), English (United Kingdom) or an other country that uses a dot "." as decimal separator. Or change it to for example Dutch (Netherlands) if you have the opposite problem.
Change LocaleID


Now run the package again to see the result.
Success


SSIS Appetizer: XML source is already sorted

$
0
0
Case
I have a large XML file with Orders and Onderlines which I want to (merge) join into a new destination. To join the two outputs I need to order them, but the sort transformation takes too much time. Is there a faster alternative?
XML Source with two joined outputs


Solution
The solution is surprisingly quite simple: the outputs are already sorted and you only have to tell SSIS that (Similar to a source with order by in the query).

For XML files with multiple levels (first for orders and second for orderlines) like below, SSIS will create two output ports.
XML Sample


The outputs will have an extra bigint column which allows you to connect the orderlines to the correct order.
Two outputs with additional ID column


Instead of using these ID columns in the SORT transformations, you can also use the advanced editor of the XML source to tell SSIS that these columns are already sorted. Right click the XML source and choose 'Show Advanced Editor...'.
Show Advanced Editor...


Then go to the last page 'Input and Output Property' and select the Orderline output. In the properties of this output you can tell SSIS that the output is sorted.
Set IsSorted to true


Next expand OrderLine and then Output Columns and click on the additional ID column 'Order_Id'. In its properties locate the SortKeyPosition and change it from 0 to 1.
Set SortKeyPosition to 1


Repeat this for the second output called 'Order' and then close the advanced editor. If you still have the SORT transformations, you will notice the yellow triangle with the exclamation mark in it. It tells you that the data is already sorted and that you can remove the SORT transformations.
And if you edit the Data Flow Path and view the metadata you will see that the column is now sorted.
Sorted! Remove the SORT transformations!


Conclusion
The solution is very simple and perhaps this should have been the default sort key position anyway? It smells like a bug to me...
No sorts!


Change Protection Level for all packages at once

$
0
0
Case
I created dozens of packages in my project but I forgot to change the default Protection Level in the project properties from "EncryptSensitiveWithUserKey" to "DontSaveSensitive". Now I have to change all packages one by one. Is there an alternative? I tried search and replace in the XML, but I can't find the Protection Level property.


Solution
Of course the best option is to prevent this from happening by setting the default before you start. You can do this in the properties of the project. All new packages will then inherit the Protection Level from the project.
Setting Protection Level on project


First, when trying to search and replace in the XML code of the packages you will notice that you cannot find the default 'EncryptSensitiveWithUserKey' which makes it hard to replace.
Default Protection Level is not in package


Secondly, the Protection Level is also stored in the Visual Studio project file (*.dtproj). When you open a package in design mode and press the save button it also updates metadata in the project file.
Protection Level in project file as well


Solution A
Good old Command Prompt to the rescue! The dtutil Utility can do the package conversion for you. If you are afraid of the Command Prompt or even never heard about it, then don't use this solution.

1) Command Prompt
Open a Command Prompt and use CD (Change Directory) command to navigate to your folder with packages.
Navigate to your project folder with packages


2) Foreach Loop Container in DOS
Now you can call the dtutil Utility for each package in that folder with something similar as a Foreach Loop Container:
FOR %p IN (*.dtsx) DO dtutil.exe /file %p /encrypt file;%p;0 /quiet
The colors explain the command


3) Execute
When you execute the command, dtutil Utility will quickly change the Protection Level of all your packages.
101 packages changed within 5 seconds. Try that in Visual Studio!


4) Project Protection Level
If you haven't already done it, change the Protection Level in the Project Properties. See second screenshot of this blog post.

5) dtproj file
Now the project and all its packages have the same Protection Level, but the project doesn't now that yet. If you try to execute a package it will complain about the Protection Level inconsistencies.
Failed to execute the package or element. Build errors were encountered.


Error : Project consistency check failed. The following inconsistencies were detected:
 MyPackage000.dtsx has a different ProtectionLevel than the project.
 MyPackage001.dtsx has a different ProtectionLevel than the project.

To update the dtproj file you have to open all packages and then Rebuild the project. This will update the project file. Now you can execute the packages without the consistency error.
Open all packages and rebuild the project


Solution B
Good old PowerShell to the rescue! This PowerShell script does the same as above, but also changes the project file. So no manual labour at all. Because the dtutil utility was so fast, I didn't edit the packages with .net libraries. It just executes dtutil in a hidden window.

The script is thoroughly tested for SSIS 2012-2016 from 'EncryptSensitiveWithUserKey' to 'DontSaveSensitive'. Other situations require more testing. Make sure to keep a copy of your project before using this script and let me know which situations require some more attention.
Change the protection level of the entire project in seconds


#PowerShell script
################################
########## PARAMETERS ##########
################################
$projectFolder = "C:\SSIS\myProject\myProject"
$dtutilPath = "C:\Program Files\Microsoft SQL Server\130\DTS\Binn\dtutil.exe"
# The number changes per SQL Server version
# 130=2016, 120=2014, 110=2012
# Also check the drive where SQL Server is
# installed


#################################################
########## DO NOT EDIT BELOW THIS LINE ##########
#################################################
clear
Write-Host "========================================================================================="
Write-Host "== Used parameters =="
Write-Host "========================================================================================="
Write-Host "Project Folder :" $projectFolder
Write-Host "dtutil Path :" $dtutilPath
Write-Host "========================================================================================="


######################################
########## Check parameters ##########
######################################
# Test whether the paths are filled
# and exists.
if ($projectFolder -eq "")
{
Throw [System.Exception] "Project path parameter is mandatory"
}
elseif (-Not (Test-Path $projectFolder))
{
Throw [System.IO.FileNotFoundException] "Project path $($projectFolder) doesn't exists!"
}
elseif (-Not $projectFolder.EndsWith("\"))
{
# Make sure path ends with \ for command
$projectFolder = $projectFolder + "\"
}
if ($dtutilPath -eq "")
{
Throw [System.Exception] "dtutil parameter is mandatory"
}
elseif (-Not (Test-Path $dtutilPath))
{
Throw [System.IO.FileNotFoundException] "dtutil not found at $($dtutilPath)"
}


#############################################
########## dtutil for loop command ##########
#############################################
# In this script we are executing dtutil.exe
# Perhaps a bit quick & dirty, but more quick
# than dirty. It changes 100 packages within
# seconds.
$command = "/C FOR %p IN ($($projectFolder)*.dtsx) DO dtutil.exe /file %p /encrypt file;%p;0 /quiet"
Write-Host "Editing packages in $($projectFolder)... " -NoNewline

# Open the command prompt (hidden) and execute
# dtutil.exe with the parameters from above.
Start-Process "C:\Windows\System32\cmd.exe" -ArgumentList $command -WindowStyle Hidden -Wait
Write-Host "Done."


##########################################
########## Editing project file ##########
##########################################
# Find the project file. There should be
# only one dtproj file.
$projectFile = get-childitem $projectFolder -name -filter *.dtproj
Write-Host "Editing project file $($projectFile)... " -NoNewline

# Edit the project file and replace the
# protection level. First replace is for
# all the packages and the second replace
# is for the project itself. It uses a
# regular expression for the replace, but
$projectFilePath = Join-Path -Path $projectFolder -ChildPath $projectFile
(Get-Content $projectFilePath) -replace 'ProtectionLevel">[0-9]', 'ProtectionLevel">0' -replace 'ProtectionLevel="[A-Za-z]*"', 'ProtectionLevel="DontSaveSensitive"' | Set-Content $projectFilePath
Write-Host "Done."

##############################
########## Finished ##########
##############################
# Finished editing packages and project file
Write-Host "Finished editing $($projectFile) and $((get-childitem $projectFolder -name -filter *.dtsx).Count) packages" -ForegroundColor Magenta


Dynamically unpivot data

$
0
0
Case
For a client I need to read hundreds of bus route matrices and they all vary in size. This makes it hard to read them dynamically with a Foreach Loop Container because the number of columns differs per file. And I don't want to create hundreds of Data Flow Tasks by hand. Even BIML won't help this time, because the routes change regularly and I don't want to generate and deploy packages every day.
I need to dynamically unpivot data within the Data Flow Task. How do I solve this within SSIS?
Dynamically unpivot data


Solution
The trick for this case is to read everything as one big column and then dynamically split and unpivot the column in a Script Component Transformation. The unpivot output will always have three columns: Start Station, End Station and Distance. And the good news is that it has only a few lines of relatively easy code.
The solution


1) Source with one big column
Change your Flat File Connection Manager so that it will read everything as one big column. Make sure the column is big enough to fit all data. For this example I called the column 'ColumnOne'.
Flat File with one column only


2) Script Component Transformation Input
Drag a Script Component on the surface and choose Transformation. Connect it to your source. Then edit the Script Component  and go to the 'Input Columns' page. On that page select the column with all the matrix data as ReadOnly.
Input Columns


3) Script Component Transformation Input
On the 'Inputs and Outputs' page we need to add the new output columns. For this example I need a StartStation (string), EndStation (string) and the Distance (int).
An other important step is setting the SynchronousInputID property (of Output 0) to 'None'. This makes the transformation asynchronous which means the number of row in could be unequal to the number of rows out. And that means the input buffer with records isn't reused in this component, but a new output buffer will be created.
Inputs and Outputs


4) The script
Go to the script page, choose C# as scripting language and hit the Edit Script button. And now copy the contents of my Input0_ProcessInputRow method to your Input0_ProcessInputRow method. And there are also two variables called Stations and Distances. They are declared above this method. Copy those to your code and put them on the same place.
I also remove the unused methods PreExecute, PostExecute and CreateNewOutputRows to keep the code clean and mean.
#C# Code
#region Namespaces
using System;
using System.Data;
using Microsoft.SqlServer.Dts.Pipeline.Wrapper;
using Microsoft.SqlServer.Dts.Runtime.Wrapper;
#endregion

/// <summary>
/// Split and unpivot data
/// </summary>
[Microsoft.SqlServer.Dts.Pipeline.SSISScriptComponentEntryPointAttribute]
public class ScriptMain : UserComponent
{
// Define two arrays for distances and stations
// The Stations array will be filled only once
// The Distances array will change for each row
string[] Stations;
string[] Distances;

/// <summary>
/// This method is called once for every row that passes through the component from Input0.
/// </summary>
/// <param name="Row">The row that is currently passing through the component</param>
public override void Input0_ProcessInputRow(Input0Buffer Row)
{
// The first time this method executes the Stations array
// is still empty (null). In the true clause of the if-
// statement we will fill the Stations array.
// Therefore the second, third, etc. time this method
// executes we will go to the false clause of the if-
// statement.
if (Stations == null)
{
// We know that the first row contains the stations.
// We will add those to the stations array and use
// it to determine the end station later on.

// Split the string from ColumnOne on ; (or your own
// column separator). The Split returns an array.
Stations = Row.ColumnOne.Split(';');
}
else
{
// Now the rows will contain distances (and the StartStation)
// Split the distances on ; (or your own column separator)
Distances = Row.ColumnOne.Split(';');

// Now loop through distances array, but start on 1 (not on 0)
// because 0 contains the StartStation in the distances array
for (int counter = 1; counter < Distances.Length; counter++)
{
// Add new Row and then fill the columns
Output0Buffer.AddRow();
// Get the Distance from the Distance array and convert it to int
Output0Buffer.Distance = Convert.ToInt32(Distances[counter]);
// Get the Start station from the distance array (the first item)
Output0Buffer.StartStation = Distances[0];
// Get the End station from stations array
Output0Buffer.EndStation = Stations[counter];
}
}
}
}

4) The result
Now close the Script Component and add more transformations or a destination and see what the Script Component does with your data. I added a dummy Derived Column and Data Viewer to see the data before and after the Script Component. For this file I had 27 rows and columns as input and 676 rows as output (26 * 26).


SQL Nexus - PowerShell ❤️ SSIS

$
0
0
Nordic SQL Nexus 2017
Last week I had the honor to speak at SQL Nexus in Copenhagen, a marvelous three day Microsoft Data Platform event with over 70 session to choose from. You can download my PowerPoint presentation here. Scripts or links to scripts are available in the notes of the PowerPoint. Contact me if you need have any question related to this presentation. More PowerShell scripts are available here.
Presenting on an IMAX screen. No zoom-it needed

Import and export SSIS Catalog Environments with JSON

$
0
0
Case
I want to import and export Environments to/from my SSIS Catalog. Doing it manually in SSMS takes ages. How can you do that more quickly?
I want to export this environment


Solution
I will ago I created a couple of PowerShell scripts to deploy environments to your SSIS Catalog with a CSV file, database table or an array as source. The script below is a follow up that allows you to export one or more environments as json files, but also has an import method to deploy those exported environments to a Catalog: Get-CatalogEnvironment and Set-CatalogEnvironment.

This is an example of how you execute the two methods. It first starts with importing a separate script file with various methods and then you can either execute the Get or the Set method:
# PowerShell code
# If you have trouble executing a PowerShell due an Execution Policy then run
# the following script. Note that you need to run PowerShell as administrator
# More information: https://technet.microsoft.com/nl-nl/library/ee176961.aspx
# Set-ExecutionPolicy Unrestricted

# Include functions from a secondairy file
. "$PSScriptRoot\Ssisfunctions.ps1"

# Download example
Get-CatalogEnvironment -SsisServer "mySqlServer\myInstance" -ExportPath "c:\backup\" -FolderName MyEnvFolder -EnvironmentName MyEnvName -Verbose

# Upload example
Set-CatalogEnvironment -SsisServer "mySqlServer\myInstance" -FolderName MyEnvFolder -EnvironmentName MyEnvName -ImportFilePath "C:\temp\employees.json" -DeleteExistingEnvironment $true -Verbose
Example of execution


The environment json files look like this:
[
{
"Name":"FolderStageFiles",
"Description":"Location of stage files",
"Type":"String",
"Sensitive":false,
"Value":"d:\\sources\\"
},
{
"Name":"FtpPassword",
"Description":"Secret FTP password",
"Type":"String",
"Sensitive":true,
"Value":$3cr3t
},
{
"Name":"MIS_STG_Connectionstring",
"Description":"Connectionstring to stage database",
"Type":"String",
"Sensitive":false,
"Value":"Data Source=.\\sql2016;Initial Catalog=MIS_STG;Provider=SQLNCLI11.1;Integrated Security=SSPI;Auto Translate=False;"
},
{
"Name":"NumberOfRetries",
"Description":"Number of retries for Webservice Task",
"Type":"Int16",
"Sensitive":false,
"Value":3
}
]

You can also get detailed help information and instructions with the standard PowerShell method. Get-Help. It allows you to see examples or the see which parameter is mandatory or optional.
# PowerShell code
# Getting help about the commands
Get-Help Set-CatalogEnvironment -detailed
Get-Help Get-CatalogEnvironment -example

And this is the content of the Ssisfunctions.ps1 file containing the various methods. Take a look and let me know if you have any improvements
# PowerShell code: Ssisfunctions.ps1 (v0.1)
<#
.Synopsis
Download one or more environments from an SSIS Catalog as JSON files

.DESCRIPTION
This functions allows you to download an Environment from the SSIS Catalog. By leaving out the foldername or environmentname you can also download
multiple files. All files are downloaded as JSON files in the format [FolderName].[EnvironmentName].json
Example file of export:

[
{
"Name":"FolderStageFiles",
"Description":"Location of stage files",
"Type":"String",
"Sensitive":false,
"Value":"d:\\sources\\"
},
{
"Name":"FtpPassword",
"Description":"Secret FTP password",
"Type":"String",
"Sensitive":true,
"Value":null
},
{
"Name":"MIS_STG_Connectionstring",
"Description":"Connectionstring to stage database",
"Type":"String",
"Sensitive":false,
"Value":"Data Source=.\\sql2016;Initial Catalog=MIS_STG;Provider=SQLNCLI11.1;Integrated Security=SSPI;Auto Translate=False;"
},
{
"Name":"NumberOfRetries",
"Description":"Number of retries for Webservice Task",
"Type":"Int16",
"Sensitive":false,
"Value":3
}
]

.PARAMETER SsisServer
Mandatory: The name of the SQL Server instance that runs the SSIS Catalog

.PARAMETER FolderName
Optional: The name of the Catalog folder that contains the Environment

.PARAMETER EnvironmentName
Optional: The name of the Environment

.PARAMETER ExportPath
Optional: The fully qualified path where the json files will be saved. Default value: c:\temp\

.PARAMETER Verbose
Optional: Get more logging information on the screen

.EXAMPLE
Get-CatalogEnvironment -SsisServer "myServer\myInstance" -ExportPath "c:\backup\" -FolderName myCatalogFolder -EnvironmentName myEnvironmentName

.EXAMPLE
Get-CatalogEnvironment -SsisServer "myServer\myInstance" -ExportPath "c:\backup\" -Verbose

.NOTES
You cannot get the value of sensitive variables.The value will be NULL in the export file.
Current scripts works for SSIS 2016. Change version number in code to use an other version of SSIS.

.LINK
https://microsoft-ssis.blogspot.com/
#>
Function Get-CatalogEnvironment
{
[CmdletBinding()]
Param
(
[Parameter(Mandatory=$true, Position=0)]
[ValidateLength(1,50)] # String must be between 1 and 50 chars long
[string]$SsisServer,

[Parameter(Mandatory=$false, Position=1)]
[ValidateLength(1,128)] # String must be between 1 and 128 chars long
[string]$FolderName,

[Parameter(Mandatory=$false, Position=2)]
[ValidateLength(1,128)] # String must be between 1 and 128 chars long
[string]$EnvironmentName,

[Parameter(Mandatory=$false, Position=3)]
[string]$ExportPath = "C:\temp\"
)

# Don't continue after error
$ErrorActionPreference = "Stop"

#################################################
############## SHOW ALL PARAMETERS ##############
#################################################
Write-Verbose "========================================================="
Write-Verbose "==     Used parameters - Get-CatalogEnvironment       =="
Write-Verbose "========================================================="
Write-Verbose "SSISServer              : $($SsisServer)"
Write-Verbose "FolderName         : $($FolderName)"
Write-Verbose "EnvironmentName : $($EnvironmentName)"
Write-Verbose "ExportPath      : $($ExportPath)"
Write-Verbose "========================================================="

 
#################################################
############### ADD SSIS ASSEMBLY ###############
#################################################
# Change assembly version number to use an other SSIS version
# 13.0.0.0 = SSIS 2016
# 12.0.0.0 = SSIS 2014
# 11.0.0.0 = SSIS 2012
$SsisNamespace = "Microsoft.SqlServer.Management.IntegrationServices"
Add-Type -AssemblyName "$($SsisNamespace), Version=13.0.0.0, Culture=neutral, PublicKeyToken=89845dcd8080cc91"


#################################################
############ CONNECT TO SSIS SERVER #############
#################################################
# First create a connection to SQL Server
$SqlConnectionstring = "Data Source=$($SsisServer);Initial Catalog=master;Integrated Security=SSPI;"
$SqlConnection = New-Object System.Data.SqlClient.SqlConnection $SqlConnectionstring

# Then use that SQL connection to create an
# Integration Services object.
$IntegrationServices = New-Object $SsisNamespace".IntegrationServices" $SqlConnection

# Check if connection succeeded
If (!$IntegrationServices)
{
Throw [System.Exception] "Failed to connect to server $($SsisServer)"
}
Else
{
Write-Verbose "Connected to server $($SsisServer)"
}


#################################################
########### CONNECT TO SSIS CATALOG #############
#################################################
# Create object for SSISDB Catalog
$Catalog = $IntegrationServices.Catalogs["SSISDB"]

# Check if the SSISDB Catalog exists
If (!$Catalog)
{
# Catalog does not exist.
Throw [System.Exception] "SSISDB catalog does not exist"
}
Else
{
Write-Verbose "SSISDB catalog found"
}


#################################################
############## CHECK EXPORT FOLDER ##############
#################################################
# Check if folder exists
If (-Not (Test-Path $ExportPath))
{
# Create new folder
New-Item -ItemType directory -Path $ExportPath | Out-Null
Write-Host "Folder created: " $ExportPath
}
Else
{
Write-Verbose "Folder $($ExportPath) found"
}


#################################################
############# LOOP THROUGH FOLDERS ##############
#################################################
# Loop though all folder or filter on a folder name
Foreach ($Folder in $Catalog.Folders | WHERE {$_.Name -eq $FolderName -or (!$FolderName)})
{
# Loop though all environments or filter on a environment name
Foreach ($Environment in $Folder.Environments | WHERE {$_.Name -eq $EnvironmentName -or (!$EnvironmentName)})
{
Write-Host "Exporting $($ExportPath)$($Folder.Name).$($Environment.Name).json"
$Environment.Variables | Select-Object -Property Name,Description,@{Name='Type';Expression={"$($_.Type)"}},Sensitive,Value | ConvertTo-Json -Compress | Out-File "$($ExportPath)$($Environment.Parent.Name).$($Environment.Name).json"

# Show warnings if the environment contains sensitive variables
$Environment.Variables | Select-Object -Property Name,Sensitive | Where {$_.Sensitive -eq $True} | ForEach-Object {
Write-Warning "Variable $($_.Name) is sensitive. Cannot retrieve its value"
}
}
}

}

<#
.Synopsis
Upload a json environment file to an SSIS Catalog

.DESCRIPTION
This functions allows you to upload an Environment to the SSIS Catalog. It can update (no deletes) or replace an existing environment.
Example file which can be imported:

[
{
"Name":"FolderStageFiles",
"Description":"Location of stage files",
"Type":"String",
"Sensitive":false,
"Value":"d:\\sources\\"
},
{
"Name":"FtpPassword",
"Description":"Secret FTP password",
"Type":"String",
"Sensitive":true,
"Value":$3cr3t
},
{
"Name":"MIS_STG_Connectionstring",
"Description":"Connectionstring to stage database",
"Type":"String",
"Sensitive":false,
"Value":"Data Source=.\\sql2016;Initial Catalog=MIS_STG;Provider=SQLNCLI11.1;Integrated Security=SSPI;Auto Translate=False;"
},
{
"Name":"NumberOfRetries",
"Description":"Number of retries for Webservice Task",
"Type":"Int16",
"Sensitive":false,
"Value":3
}
]

.PARAMETER SsisServer
Mandatory: The name of the SQL Server instance that runs the SSIS Catalog

.PARAMETER FolderName
Mandatory: The name of the Catalog folder where the Evironment will be stored

.PARAMETER EnvironmentName
Mandatory: The name of the Environment

.PARAMETER ImportFilePath
Mandatory: The fully qualified path of the json file that needs to be imported

.PARAMETER DeleteExistingEnvironment
Optional: Setting to $true first deletes an existing environment. Default value: $false

.PARAMETER Verbose
Optional: Get more logging information on the screen

.EXAMPLE
Set-CatalogEnvironment -SsisServer "MYSERVER\myInstance" -FolderName MyEnvFolder -EnvironmentName MyEnvName -ImportFilePath "C:\backup\Environments.Generic.json" -DeleteExistingEnvironment $true

.EXAMPLE
Set-CatalogEnvironment -SsisServer "MYSERVER\myInstance" -FolderName MyEnvFolder -EnvironmentName MyEnvName -ImportFilePath "C:\backup\Environments.Generic.json" -Verbose

.NOTES
You cannot insert null values. The will be skipped with a warning
Current scripts works for SSIS 2016. Change version number in code
to use an other version of SSIS.

.LINK
https://microsoft-ssis.blogspot.com/
#>
Function Set-CatalogEnvironment
{
[CmdletBinding()]
Param
(
[Parameter(Mandatory=$true, Position=0)]
[ValidateLength(1,50)] # String must be between 1 and 50 chars long
[string]$SsisServer,

[Parameter(Mandatory=$true, Position=1)]
[ValidateLength(1,128)] # String must be between 1 and 128 chars long
[string]$FolderName,

[Parameter(Mandatory=$true, Position=2)]
[ValidateLength(1,128)] # String must be between 1 and 128 chars long
[string]$EnvironmentName,

[Parameter(Mandatory=$true, Position=3)]
[ValidateScript({Test-Path -Path $_ -PathType Leaf})] # File must exist
[ValidatePattern(‘.json$’)] # Extension must be .json
[string]$ImportFilePath,

[Parameter(Mandatory=$false, Position=4)]
[bool]$DeleteExistingEnvironment = $false
)

# Don't continue after error
$ErrorActionPreference = "Stop"

#################################################
############## SHOW ALL PARAMETERS ##############
#################################################
Write-Verbose "========================================================="
Write-Verbose "==     Used parameters - Set-CatalogEnvironment       =="
Write-Verbose "========================================================="
Write-Verbose "SSISServer              : $($SsisServer)"
Write-Verbose "FolderName         : $($FolderName)"
Write-Verbose "EnvironmentName : $($EnvironmentName)"
Write-Verbose "ImportFilePath      : $($ImportFilePath)"
Write-Verbose "DeleteExistingEnvironment : $($ImportFilePath)"
Write-Verbose "========================================================="


#################################################
############### ADD SSIS ASSEMBLY ###############
#################################################
# Change assembly version number to use an other SSIS version
# 13.0.0.0 = SSIS 2016
# 12.0.0.0 = SSIS 2014
# 11.0.0.0 = SSIS 2012
$SsisNamespace = "Microsoft.SqlServer.Management.IntegrationServices"
Add-Type -AssemblyName "$($SsisNamespace), Version=13.0.0.0, Culture=neutral, PublicKeyToken=89845dcd8080cc91"


#################################################
############ CONNECT TO SSIS SERVER #############
#################################################
# First create a connection to SQL Server
$SqlConnectionstring = "Data Source=$($SsisServer);Initial Catalog=master;Integrated Security=SSPI;"
$SqlConnection = New-Object System.Data.SqlClient.SqlConnection $SqlConnectionstring

# Then use that SQL connection to create an
# Integration Services object.
$IntegrationServices = New-Object $SsisNamespace".IntegrationServices" $SqlConnection

# Check if connection succeeded
If (!$IntegrationServices)
{
Throw [System.Exception] "Failed to connect to server $($SsisServer)"
}
Else
{
Write-Verbose "Connected to server $($SsisServer)"
}


#################################################
########### CONNECT TO SSIS CATALOG #############
#################################################
# Create object for SSISDB Catalog
$Catalog = $IntegrationServices.Catalogs["SSISDB"]

# Check if the SSISDB Catalog exists
If (!$Catalog)
{
# Catalog does not exist. Different name used?
Throw [System.Exception] "SSISDB catalog does not exist"
}
Else
{
Write-Verbose "SSISDB catalog found"
}


#################################################
################## CHECK FOLDER #################
#################################################
# Create object to the (new) folder
$Folder = $Catalog.Folders[$FolderName]
 
# Check if folder exists
If (!$Folder)
{
     # Folder doesn't exists, so create the new folder.
     Write-Host "Creating new folder $($FolderName)"
     $Folder = New-Object $SsisNamespace".CatalogFolder" ($Catalog, $FolderName, $FolderName)
     $Folder.Create()
}
Else
{
     Write-Verbose "Folder $($FolderName) found"
}


#################################################
################## ENVIRONMENT ##################
#################################################
# Create object for the (new) environment
$Environment = $Folder.Environments[$EnvironmentName]

# Check if folder already exists
If (-not $Environment)
{
Write-Host "Creating new environment $($EnvironmentName) in $($FolderName)"

$Environment = New-Object $SsisNamespace".EnvironmentInfo" ($Folder, $EnvironmentName, $EnvironmentName)
$Environment.Create()
}
ElseIf($DeleteExistingEnvironment -and $Environment)
{
Write-Verbose "Environment $($EnvironmentName) found with $($Environment.Variables.Count) existing variables"
Write-Host "Dropping and recreating environment $($EnvironmentName) in $($FolderName)"
$Environment.Drop()
$Environment = New-Object $SsisNamespace".EnvironmentInfo" ($folder, $EnvironmentName, $EnvironmentName)
$Environment.Create()
}
Else
{
Write-Verbose "Environment $($EnvironmentName) found with $($Environment.Variables.Count) existing variables"
}


#################################################
############### GET FILE CONTENT ################
#################################################
Write-Verbose "Reading $($ImportFilePath)"
$EnvironmentInput = Get-Content -Raw -Path $ImportFilePath | ConvertFrom-Json


#################################################
################### VARIABLES ###################
#################################################
# Keep track of number of updates and inserts
$InsertCount = 0
$UpdateCount = 0

# Loop through file content
$EnvironmentInput | Select-Object -Property Name,Description,Type,Sensitive,Value | ForEach-Object {

# Get variablename from json and try to find it in the environment
$Variable = $Environment.Variables[$_.Name]

# Make sure each variable has a value
If (!$_.Value)
{
Write-Warning "Variable $($_.Name) skipped because it has no value"
}
else
{
# Check if the variable exists
If (-not $Variable)
{
# Insert new variable
Write-Verbose "Variable $($_.Name) added"
$Environment.Variables.Add($_.Name, $_.Type, $_.Value, $_.Sensitive, $_.Description)

$InsertCount = $InsertCount + 1
}
else
{
# Update existing variable
Write-Verbose "Variable $($_.Name) updated"
$Variable.Type = $_.Type
$Variable.Value = $_.Value
$Variable.Description = $_.Description
$Variable.Sensitive = $_.Sensitive

$UpdateCount = $UpdateCount + 1
}
}
}
$Environment.Alter()

Write-Host "Finished, total inserts $($InsertCount) and total updates $($UpdateCount)"
}

Later on I will add various extra methods for example to test the existence of an environment, to delete an environment, to move an environment, to copy an environment, to rename an environment or to connect an environment to a project. Please let me know if you have any suggestions for extra functionality or improvements!
Viewing all 149 articles
Browse latest View live