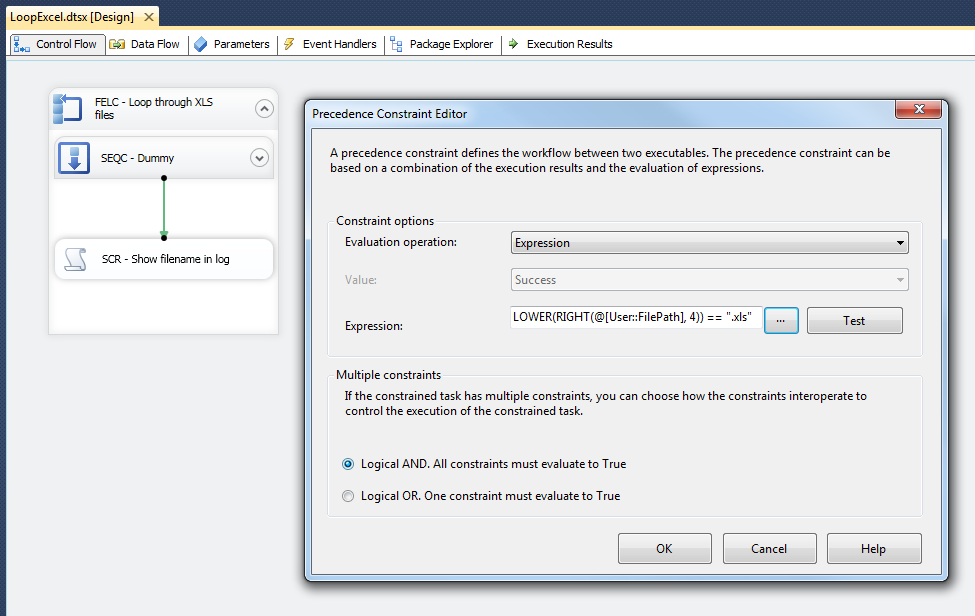
Quantcast
Channel: Microsoft SQL Server Integration Services
Viewing all 149 articles
Browse latest View live

Foreach loop with *.xls wildcard also returns *.xlsx files

$
0
0
Case
I have a Foreach Loop Container with a file enumerator. The wildcard is *.xls, but it also returns *.xlsx files. How do I prevent that?

Loop through *.xls also includes xlsx files


My xls loop includes xlsx and xlsm files


Solution
This is actually similar to the DIR command in a DOS/Command Prompt.
All xls files? (/b is to remove my Dutch header/footer)


The workaround is simple. And if you don't like the solution then you could use my Sorted File Enumerator that also supports regular expression wildcards.

1) Dummy
Add an empty/dummy task or Sequence Container in your Foreach Loop Container. And connect it to your first task.

Empty/collapsed Sequence Container added


2) Precedence Constraint Expression
Add an expression on the Precedence Constraint between the dummy and your first task. It should look something like LOWER(RIGHT(@[User::FilePath], 4)) == ".xls" (replace the variablename and/or file extension).

Expression with LOWER and RIGHT to check the file extension


3) The result
Now test the package (Replace my example Script Task with your own tasks).
The result: only two xls files and no xlsx or xlsm files


'Auto Layout - Diagram' missing in Layout Toolbar

$
0
0
Case
I often use the 'Auto Layout - Diagram' option in the Format-menu to auto arrange my tasks or transformations, but it costs me three clicks (/moves). All other options from the Format-menu can be found in the Layout toolbar (one click only), except the Auto Layout - Diagram option. Is there a way to solve that for 'lazy' developers?
Three clicks instead of one


Solution
Yes there is! Screens are from VS2010, but it works the same in newer versions.

1) Show Layout toolbar
First make sure the Layout toolbar is visible. If it's not visible, rightclick the toolbar and select the Layout toolbar.
Show Layout toolbar


2) Add Button
Click on the little triangle on the right site of the toolbar and choose 'Add or Remove Buttons'. After that choose 'Customize...'. Now the Toolbar Customize window will show.
Customize window


3) Add Command
Click on the Add Command button and choose Format as category and then locate the Diagram command. Click OK to add it and click Close to close the customize window.
Add command


4) The Result
Now the new button is available in the Layout toolbar and with one click you can auto arrange your package.
One click only :-)


SQL Saturday #336 Holland - Powerpointslides

$
0
0

Had a nice day at SQL Saturday #336 in Utrecht! The PowerPoint slides of my SSIS Development Best Practices session are available for download. I added some screens, text and URL's for additional information (see notes in PowerPoint)

Method not found: IsVisualStudio2012ProInstalled()

$
0
0
Case
I just installed SSDT 2012 on top of SSIS 2012 with SSDT 2010, but when I want to run a package I get an error:

Method not found: 'Boolean Microsoft.SqlServer.Dts.Design.VisualStudio2012Utils.IsVisualStudio2012ProInstalled()'.


Solution
Apparently the Microsoft.SqlServer.Dts.Design dll belonging to SSDT 2012 is not installed in the GAC during installation. The version belonging to SSDT 2010 is still in the GAC. On the left side the assembly before fixing this bug and on the right side the assembly after fixing this bug. Ironically the assembly from 2012 has a lower version than 2010. Dave found a solution for it.
Microsoft.SqlServer.Dts.Design dll before and after fixing the bug.


1)  Close SSDT 2012
Close Visual Studio (SSDT) 2012.

2) Visual Studio Command Prompt
Open the Visual Studio Command Prompt as administrator (otherwise the gacutil will return an error). You can do this by right clicking the shortcut and then choose Run as Administrator.

3) Change Directory
Enter the following command to change the direcory to the PrivateAssemblies folder of SSDT 2012:
cd C:\Program Files (x86)\Microsoft Visual Studio 11.0\Common7\IDE\PrivateAssemblies

4) Run GACUTIL
Run GACUTIL with the following parameters to add the assembly from SSDT 2012 to the GAC:
gacutil/if Microsoft.SqlServer.Dts.Design.dll
Parameter /if will force the installation of this assembly regardsless of any existing versions of the assembly
gacutil/if Microsoft.SqlServer.Dts.Design.dll


5) Open SSDT 2012
Now open SSDT 2012 and try running the package again to check the fix.

Create Windows Service to watch files for SSIS

$
0
0
Case
I want to use the WMI Event Watcher Task to watch for new files in SSIS, but it doesn't allow me to watch subfolders and after catching an event it continues with the next task, but meanwhile it doesn't watch for new files until in starts again. Is there an alternative?
WMI Event Watcher Task


Solution
An alternative could be to create a Windows Service that does the watching part and then executes a package when a new file arrives. For this example I used the full version of Visual Studio 2010 (SSDT BI is not enough). The example is in C#, but you can easily convert that to VB.NET.

1) Windows Service Project
Start Visual Studio and create a new Windows Service Project. I used the 4.0 framework since I want to execute SSIS 2012 packages. For 2008 you can use 3.5.
Windows Service 4.0 C#


2) App.Config
To avoid hardcoded connection strings, paths and filters, we first have to add an Application Configuration File (App.config). Right Click the project in the solution explorer, choose Add, New Item... and then Application Configuration File. After adding the app.config we need to edit it. You can copy the XML below to start with and add extra parameters at the end. Make sure the values are correct.
app.config


<?xml version="1.0" encoding="utf-8" ?>
<configuration>
<appSettings>
<add key="WatcherPath" value="d:\MySourceFiles"/>
<add key="WatcherFilter" value="*.csv"/>

<add key="SqlConnectionString" value="Data Source=.\SQL2012;Initial Catalog=master;Integrated Security=SSPI;"/>
<add key="Catalog" value="SSISDB"/>
<add key="Folder" value="MyFolder"/>
<add key="Project" value="MyProject"/>
<add key="Package" value="MyPackage.dtsx"/>

<add key="LogFile" value="d:\FileWatcherForSSIS\log.txt"/>
</appSettings>
</configuration>
MyCatalogStructure


3) Add References
Right click references in the Solution Explorer and choose Add Reference... For the configuration part we need to add two extra references that can be found in the .NET tab:
- System.Configuration.dll
- System.Configuration.Install.dll
Add References


For executing the SSIS packages we need four extra references that can be found in the GAC (MSIL) folder. The exact place could vary, but here are mine for SSIS 2012. Use the browse tab in the Add Reference Window to add them.
C:\Windows\assembly\GAC_MSIL\Microsoft.SqlServer.ConnectionInfo\11.0.0.0__89845dcd8080cc91\Microsoft.SqlServer.ConnectionInfo.dll
C:\Windows\assembly\GAC_MSIL\Microsoft.SqlServer.Management.Sdk.Sfc\11.0.0.0__89845dcd8080cc91\Microsoft.SqlServer.Management.Sdk.Sfc.dll
C:\Windows\assembly\GAC_MSIL\Microsoft.SqlServer.Smo\11.0.0.0__89845dcd8080cc91\Microsoft.SqlServer.Smo.dll
C:\Windows\assembly\GAC_MSIL\Microsoft.SqlServer.Management.IntegrationServices\11.0.0.0__89845dcd8080cc91\Microsoft.SqlServer.Management.IntegrationServices.dll


4) Services1.cs
Now open the source code of Services1.cs to add the actual Windows Services code. In the grey designer surface press F7 or click on the link to switch to code view. Copy the code below. If you don't want to use the Project Deployment Model then you must slightly change the code in the watcher_Created method.
// C# code
using System;
using System.Collections.Generic;
using System.Collections.ObjectModel; // Added
using System.ComponentModel;
using System.Configuration; // Added
using System.Data;
using System.Data.SqlClient; // Added
using System.Diagnostics;
using System.IO; // Added
using System.Linq;
using System.ServiceProcess;
using System.Text;
using Microsoft.SqlServer.Management.IntegrationServices; // Added

namespace FileWatcherForSSIS
{
public partial class Service1 : ServiceBase
{
public Service1()
{
InitializeComponent();
}

/// <summary>
/// Method that executes when the services starts
/// </summary>
/// <param name="args"></param>
protected override void OnStart(string[] args)
{
// Create FileSystemWatcher dynamically instead of via the designer
FileSystemWatcher watcher = new FileSystemWatcher();

// Determine the folder you are watching
watcher.Path = ConfigurationManager.AppSettings["WatcherPath"];

// Determine for which files to watch
watcher.Filter = ConfigurationManager.AppSettings["WatcherFilter"];

// Determine whether you also want to watch subfolders
watcher.IncludeSubdirectories = true;

// Determine for which changes to watch (multiple notify
// filters should be seperated by a pipeline |
watcher.EnableRaisingEvents = true;
//watcher.NotifyFilter = NotifyFilters.CreationTime;

// Determine what to do for which events
watcher.Created += new FileSystemEventHandler(watcher_Created);

// Log start of service
logText("FileWatcher started watching " + watcher.Path);
}

/// <summary>
/// Method that executes when the services stops
/// </summary>
protected override void OnStop()
{
// Log start of service
logText("FileWatcher stopped watching ");
}

// Define the event handlers.
private static void watcher_Created(object sender, FileSystemEventArgs e)
{
// Log start of service
logText("FileWatcher catched " + e.FullPath);

// Connection to the database server where the packages are located
using (SqlConnection ssisConnection = new SqlConnection(ConfigurationManager.AppSettings["SqlConnectionString"]))
{
try
{
// SSIS server object with sql connection
IntegrationServices ssisServer = new IntegrationServices(ssisConnection);

// Get values from app.config
string catalog = ConfigurationManager.AppSettings["Catalog"];
string folder = ConfigurationManager.AppSettings["Folder"];
string project = ConfigurationManager.AppSettings["Project"];
string package = ConfigurationManager.AppSettings["Package"];

// The reference to the package which you want to execute
PackageInfo ssisPackage = ssisServer.Catalogs[catalog].Folders[folder].Projects[project].Packages[package];

// Create collection of parameters
Collection<PackageInfo.ExecutionValueParameterSet> executionParameter = new Collection<PackageInfo.ExecutionValueParameterSet>();

// Add a package parameter
executionParameter.Add(new PackageInfo.ExecutionValueParameterSet { ObjectType = 30, ParameterName = "MyFilePathParameter", ParameterValue = e.FullPath });

// Add a logging level parameter: 1=basic, 2=performance
executionParameter.Add(new PackageInfo.ExecutionValueParameterSet { ObjectType = 50, ParameterName = "LOGGING_LEVEL", ParameterValue = 1 });

// Execute package asynchronized and get
// the identifier of the execution
long executionIdentifier = ssisPackage.Execute(false, null, executionParameter);

// Prevent 30 second time-out by getting the execution
// by its ID and then wait until it's completed
ExecutionOperation executionOperation = ssisServer.Catalogs[catalog].Executions[executionIdentifier];

// Wait while package is busy
while (!(executionOperation.Completed))
{
// Refresh and wait 5 seconds before retesting
executionOperation.Refresh();
System.Threading.Thread.Sleep(5000);
}

// Log package completion
logText("Package completed " + package);
}
catch (Exception ex)
{
logText("FileWatcher error " + ex.Message);
}
}
}

/// <summary>
/// Write message to log
/// </summary>
/// <param name="logText">the log message</param>
private static void logText(string logText)
{
// Simple log version. You can replace it by for example an eventlog writer
using (FileStream fs = new FileStream(ConfigurationManager.AppSettings["LogFile"], FileMode.Append, FileAccess.Write))
using (StreamWriter sw = new StreamWriter(fs))
{
sw.WriteLine(DateTime.Now.ToString() + " - " + logText);
}
}
}
}


5) Installer.cs
To make the Windows Services installable we need to add an Installer Class by right clicking the Solution Explorer and choose Add, New Item..
Installer.cs


6) Add Service(Process)Installer
Next you can drag ServiceInstaller and ServiceProcessInstaller from the toolbox to the designer surface of install.cs. If they are not available in the toolbox then you need to add them manually by right clicking the toolbox and choose Choose Items... (just like in SSIS 2008 when adding Third Party tasks).
Service(Process)Installer


7) Edit Service(Process)Installer
In the properties of serviceInstaller1 you can set values for properties like ServiceName, DisplayName and the Description of the service.
Service Properties


8) Building & Deploying
Now build the project in release mode (via build menu or Ctrl + Shft + B) and go to the bin release folder of your project. Copy these files to a suitable location for the service.
Bin Release Folder


9) InstallUtil
Now open the Visual Studio 201X command prompt as Administrator (otherwise you don't have rights to add a new service). In the command prompt go to the folder where the service is located.
Then enter the following command: installutil FileWatcherForSSIS.exe. During installation it will ask for the account that runs the service. The user must be able to read the folder and to execute the package (just like the user in a SQL Server Agent jobstep). For your production server without Visual Studio (and without installutil.exe) you need to create a setup project in Visual Studio to install your new Windows Services.
Visual Studio Command Prompt (run as Administrator)


10) Start Service and test
Now go to your local services and start the new Windows Service. Then start watch the log while adding a new file in the folder that you are watching.
The new Windows Service


Log file


Download Visual Studio 2010 Example Project

Note: This Windows Service must be installed on the same machine as SSIS.

Add trailing zeros

$
0
0
Case
I have a currency €25,10 but when I put it in a Flat File destination it removes all trailing zero's after the decimal symbol: 25,10 becomes 25,1 and 24,00 becomes 24. How can I prevent that?

Solution
The solution is easy. Just cast it to a numeric with the scale set to 2. Other datatypes remove the trailing zeros, but numeric seems to do the trick: (DT_NUMERIC,5,2)myNumber
CAST to get trailing zeros


For adding leading zero check this post.

Insert unknown dimension record for all dimension tables

$
0
0
Case
I have a lot of dimension packages in SSIS that all insert a default record for unknown dimension values. It's a lot of repetitive and boring work. Is there an alternative for creating an insert query manually?
A typical dimension package


Solution
Instead of creating an insert query manually for each dimension table you could also create a Stored Procedure to do this for you. Instead of the insert query in the Execute SQL Task you execute this Stored Procedure in the Execute SQL Task.
-- TSQL code
USE [datamart]
GO

/****** datamart: StoredProcedure [dbo].[InsertUnknownDimensionRow] ******/
SET ANSI_NULLS ON
GO

SET QUOTED_IDENTIFIER ON
GO

CREATE PROCEDURE [dbo].[InsertUnknownDimensionRow](@TableName nvarchar(128))
AS
BEGIN

-- This Stored Procedure inserts a record in the dimension table
-- for unknown dimension values. It generates an insert statement
-- based on the column datatypes and executes it.
-- The integer column with identity enabled gets the value -1 and
-- all other columns get a default value based on their datatype.
-- Columns with a default value are ignored.

-- Create temporary table for column specs of dimension table
DECLARE @TableSpecs TABLE (
COLUMN_ID int identity,
COLUMN_NAME nvarchar(128),
DATA_TYPE nvarchar(128),
CHARACTER_MAXIMUM_LENGTH int,
COLUMN_IS_IDENTITY bit
)

-- Use the information schema to get column info and insert it
-- to the temporary table.
INSERT @TableSpecs
SELECT C.COLUMN_NAME
, C.DATA_TYPE
, C.CHARACTER_MAXIMUM_LENGTH
, columnproperty(object_id(C.TABLE_SCHEMA + '.' + C.TABLE_NAME)
, C.COLUMN_NAME, 'IsIdentity') AS COLUMN_IS_IDENTITY
FROM INFORMATION_SCHEMA.COLUMNS C
WHERE QUOTENAME(C.TABLE_NAME) = QUOTENAME(@TableName)
AND C.COLUMN_DEFAULT IS NULL
ORDER BY C.ORDINAL_POSITION

-- Variables to keep track of the number of columns
DECLARE @ColumnId INT
SET @ColumnId = -1

DECLARE @ColumnCount INT
SET @ColumnCount = 0

-- Variables to create the insert query
DECLARE @INSERTSTATEMENT_START nvarchar(max)
DECLARE @INSERTSTATEMENT_END nvarchar(max)

SET @INSERTSTATEMENT_START = 'INSERT INTO ' + QUOTENAME(@TableName) + ' ('
SET @INSERTSTATEMENT_END = 'VALUES ('

-- Variables to complete the insert query with
-- extra enable and disable identity statements
-- You could add an extra check in the loop to
-- make sure there is an identity column in the
-- table. Otherwise the SET IDENTITY_INSERT
-- statement will fail.
DECLARE @IDENITYSTATEMENT_ON nvarchar(255)
DECLARE @IDENITYSTATEMENT_OFF nvarchar(255)

SET @IDENITYSTATEMENT_ON = 'SET IDENTITY_INSERT ' + QUOTENAME(@TableName) + ' ON;'
SET @IDENITYSTATEMENT_OFF = 'SET IDENTITY_INSERT ' + QUOTENAME(@TableName) + ' OFF;'

-- Variables filled and use the WHILE loop
DECLARE @COLUMN_NAME VARCHAR(50)
DECLARE @DATA_TYPE VARCHAR(50)
DECLARE @CHARACTER_MAXIMUM_LENGTH INT
DECLARE @COLUMN_IS_IDENTITY BIT

-- WHILE loop to loop through all columns and
-- create a insert query with the columns
WHILE @ColumnId IS NOT NULL
BEGIN
-- Keep track of the number of columns
SELECT @ColumnId = MIN(COLUMN_ID)
, @ColumnCount = @ColumnCount + 1
FROM @TableSpecs
WHERE COLUMN_ID > @ColumnCount

-- Check if there are any columns left
IF @ColumnId IS NULL
BEGIN
-- No columns left, break loop
BREAK
END
ELSE
BEGIN
-- Get info for column number x
SELECT @COLUMN_NAME = COLUMN_NAME
, @DATA_TYPE = DATA_TYPE
, @CHARACTER_MAXIMUM_LENGTH = CHARACTER_MAXIMUM_LENGTH
, @COLUMN_IS_IDENTITY = COLUMN_IS_IDENTITY
FROM @TableSpecs
WHERE COLUMN_ID = @ColumnCount
END

-- Start building the begin of the statement (same for each column)
SET @INSERTSTATEMENT_START = @INSERTSTATEMENT_START + @COLUMN_NAME + ','

-- Start building the end of the statement (the default values)
IF @COLUMN_IS_IDENTITY = 1
BEGIN
-- Default value if the current column is the identity column
SET @INSERTSTATEMENT_END = @INSERTSTATEMENT_END + '-1,'
END

IF @DATA_TYPE IN ('int', 'numeric', 'decimal', 'money', 'float', 'real', 'bigint', 'smallint', 'tinyint', 'smallmoney') AND (@COLUMN_IS_IDENTITY = 0)
BEGIN
-- Default value if the current column is a numeric column,
-- but not an identity: zero
SET @INSERTSTATEMENT_END = @INSERTSTATEMENT_END + '0,'
END

IF @DATA_TYPE IN ('char', 'nchar', 'varchar', 'nvarchar')
BEGIN
-- Default value if the current column is a text column
-- Part of the text "unknown" depending on the length
SET @INSERTSTATEMENT_END = @INSERTSTATEMENT_END + '''' + LEFT('Unknown', @CHARACTER_MAXIMUM_LENGTH) + ''','
END

IF @DATA_TYPE IN ('datetime', 'date', 'timestamp', 'datatime2', 'datetimeoffset', 'smalldatetime', 'time')
BEGIN
-- Default value if the current column is a datetime column
-- First of january 1900
SET @INSERTSTATEMENT_END = @INSERTSTATEMENT_END + '''' + CONVERT(varchar, CONVERT(date, 'Jan 1 1900')) + ''','
END

IF @DATA_TYPE = 'bit'
BEGIN
-- Default value if the current column is a boolean
SET @INSERTSTATEMENT_END = @INSERTSTATEMENT_END + '0,'
END
END

-- Remove last comma from start and end part of the insert statement
SET @INSERTSTATEMENT_START = LEFT(@INSERTSTATEMENT_START, LEN(@INSERTSTATEMENT_START) - 1) + ')'
SET @INSERTSTATEMENT_END = LEFT(@INSERTSTATEMENT_END, LEN(@INSERTSTATEMENT_END) - 1) + ');'

-- Execute the complete statement
EXEC (@IDENITYSTATEMENT_ON + '' + @INSERTSTATEMENT_START + '' + @INSERTSTATEMENT_END + '' + @IDENITYSTATEMENT_OFF)

END

GO
-- Tweak the code for your own needs and standards
-- Optional extra check if you don't want to truncate
-- your dimensions: is there already a default/unknown
-- record available

Execute Stored Procedure


Note: only the most common datatypes are handled. Add more if-statements if you expect data types like varbinary, xml, image or sql_variant

SSIS Yammer group

$
0
0

Would you like to discuss or share thoughts on what should be in the next version of SSIS? You can now join the SSIS Product Team on Yammer for discussions, demos, webcasts, etc. However only after signing a non-disclosure agreement (NDA).


Add footer to Flat File

$
0
0
Case
I have a requirement to add a footer to a flat file with data details, like row count and export date. How do I do that in SSIS?
Flat File with footer text


Solution
If you search the internet you will find several different solutions. Here is a solution with a Script Task.

1) Data Flow Task
I have a standard Data Flow Task with a Row Count Transformation to store the number of records in an integer variable named RowCount and a Flat File Destination to save the data in a textfile. The Connection Manager is named Employee.
DFT with Flat File Destination


2) Footer variable
To keep the .Net code simple and clear I will use an expression on an SSIS string variable to do all the 'difficult stuff'. Add a string variable named Footer and add an expression on it that suits your footer needs. You can make it as complex as you want. In this case a text with the rowcount in it and an export date in a certain format:
"This file contains " +  (DT_WSTR, 6)@[User::RowCount] + " records. Export date: " +
(DT_WSTR, 4)YEAR(GETDATE())  +
RIGHT("0" + (DT_WSTR, 2)MONTH(GETDATE()),2) +
RIGHT("0" + (DT_WSTR, 2)DAY(GETDATE()),2)
Expression with footer text


3) Script Task
Add a Script Task below your Data Flow Task and add the string variable as readonly variable.
Readonly variable: Footer


4) The Script
Add the following using (System.IO) and copy the content of my Main method to yours. It gets the location from your Flat File Connection Manager and appends the content of your footer variable to the bottom. Very basic code and no need to add more code other then error handling.
// C# Code
#region Namespaces
using System;
using System.Data;
using System.IO; // Added
using Microsoft.SqlServer.Dts.Runtime;
using System.Windows.Forms;
#endregion

namespace ST_719acd579f7e46adb5d68fb2fdd19625
{
[Microsoft.SqlServer.Dts.Tasks.ScriptTask.SSISScriptTaskEntryPointAttribute]
public partial class ScriptMain : Microsoft.SqlServer.Dts.Tasks.ScriptTask.VSTARTScriptObjectModelBase
{

public void Main()
{
// Get ConnectionString from Connection Manager (case sensitive)
string filePath = Dts.Connections["Employee"].AcquireConnection(Dts.Transaction).ToString();

// Open the file from the connection manager to append some text
using (StreamWriter sw = File.AppendText(filePath))
{
// Append text from string variable to file
sw.WriteLine(Dts.Variables["User::Footer"].Value.ToString());
}

// Close Script Task with success
Dts.TaskResult = (int)ScriptResults.Success;
}

#region ScriptResults declaration
/// <summary>
/// This enum provides a convenient shorthand within the scope of this class for setting the
/// result of the script.
///
/// This code was generated automatically.
/// </summary>
enum ScriptResults
{
Success = Microsoft.SqlServer.Dts.Runtime.DTSExecResult.Success,
Failure = Microsoft.SqlServer.Dts.Runtime.DTSExecResult.Failure
};
#endregion

}
}


5) The Result
Now run the package and check the result in the Flat File. Not that variable and connection manager names are case sensitive in the script.
Add Footer Script Task

Creating BIML Script Component Transformation (rownumber)

$
0
0
Case
I want to add a Script Component transformation to my bimlscript to add a rownumber functionality to my packages.

Solution
For this example I will continue with an existing BIML example. Note the target in this example is an OLE DB destination that supports an identity column. Use your own destination like Excel, Flat File or PDW that doesn't supports identity columns.
Script Component Transformation Rownumber


Above the <packages>-tag we are adding a <ScriptProjects>-tag where we define the Script Component code, including references, variables, input columns and output columns. In the <Transformations>-tag (Data Flow Task) we only reference to this Script Project.

The script code within the BIML script is aligned to the left to get a neat Script Component script layout. Otherwise you get a lot of ugly white space.


<Biml xmlns="http://schemas.varigence.com/biml.xsd">
<Annotations>
<Annotation>
File: Script Component Transformation RowNumber.biml
Description: Example of using the Script Component as
a transformation to add a rownumber to the destination.
Note: Example has an OLE DB Destination that supports
an identity column. Use your own Flat File, Excel or
PDW destination that doesn't supports an identity.
VS2012 BIDS Helper 1.6.6.0
By Joost van Rossum http://microsoft-ssis.blogspot.com
</Annotation>
</Annotations>

<!--Package connection managers-->
<Connections>
<OleDbConnection
Name="Source"
ConnectionString="Data Source=.;Initial Catalog=ssisjoostS;Provider=SQLNCLI11.1;Integrated Security=SSPI;Auto Translate=False;">
</OleDbConnection>
<OleDbConnection
Name="Destination"
ConnectionString="Data Source=.;Initial Catalog=ssisjoostD;Provider=SQLNCLI11.1;Integrated Security=SSPI;Auto Translate=False;">
</OleDbConnection>
</Connections>

<ScriptProjects>
<ScriptComponentProject ProjectCoreName="sc_c253bef215bf4d6b85dbe3919c35c167.csproj" Name="SCR - Rownumber">
<AssemblyReferences>
<AssemblyReference AssemblyPath="Microsoft.SqlServer.DTSPipelineWrap" />
<AssemblyReference AssemblyPath="Microsoft.SqlServer.DTSRuntimeWrap" />
<AssemblyReference AssemblyPath="Microsoft.SqlServer.PipelineHost" />
<AssemblyReference AssemblyPath="Microsoft.SqlServer.TxScript" />
<AssemblyReference AssemblyPath="System.dll" />
<AssemblyReference AssemblyPath="System.AddIn.dll" />
<AssemblyReference AssemblyPath="System.Data.dll" />
<AssemblyReference AssemblyPath="System.Xml.dll" />
</AssemblyReferences>
<ReadOnlyVariables>
<Variable VariableName="maxrownumber" Namespace="User" DataType="Int32"></Variable>
</ReadOnlyVariables>
<Files>
<!-- Left alignment of .Net script to get a neat layout in package-->
<File Path="AssemblyInfo.cs">
using System.Reflection;
using System.Runtime.CompilerServices;

//
// General Information about an assembly is controlled through the following
// set of attributes. Change these attribute values to modify the information
// associated with an assembly.
//
[assembly: AssemblyTitle("SC_977e21e288ea4faaaa4e6b2ad2cd125d")]
[assembly: AssemblyDescription("")]
[assembly: AssemblyConfiguration("")]
[assembly: AssemblyCompany("SSISJoost")]
[assembly: AssemblyProduct("SC_977e21e288ea4faaaa4e6b2ad2cd125d")]
[assembly: AssemblyCopyright("Copyright @ SSISJoost 2015")]
[assembly: AssemblyTrademark("")]
[assembly: AssemblyCulture("")]
//
// Version information for an assembly consists of the following four values:
//
// Major Version
// Minor Version
// Build Number
// Revision
//
// You can specify all the values or you can default the Revision and Build Numbers
// by using the '*' as shown below:

[assembly: AssemblyVersion("1.0.*")]
</File>
<!-- Replaced greater/less than by &gt; and &lt; -->
<File Path="main.cs">#region Namespaces
using System;
using System.Data;
using Microsoft.SqlServer.Dts.Pipeline.Wrapper;
using Microsoft.SqlServer.Dts.Runtime.Wrapper;
#endregion

/// &lt;summary&gt;
/// Rownumber transformation to create an identity column
/// &lt;/summary&gt;
[Microsoft.SqlServer.Dts.Pipeline.SSISScriptComponentEntryPointAttribute]
public class ScriptMain : UserComponent
{
int rownumber = 0;

/// &lt;summary&gt;
/// Get max rownumber from variable
/// &lt;/summary&gt;
public override void PreExecute()
{
rownumber = this.Variables.maxrownumber;
}

/// &lt;summary&gt;
/// Increase rownumber and fill rownumber column
/// &lt;/summary&gt;
/// &lt;param name="Row"&gt;The row that is currently passing through the component&lt;/param&gt;
public override void Input0_ProcessInputRow(Input0Buffer Row)
{
rownumber++;
Row.rownumber = rownumber;
}
}
</File>
</Files>
<InputBuffer Name="Input0">
<Columns>
</Columns>
</InputBuffer>
<OutputBuffers>
<OutputBuffer Name="Output0">
<Columns>
<Column Name="rownumber" DataType="Int32"></Column>
</Columns>
</OutputBuffer>
</OutputBuffers>
</ScriptComponentProject>
</ScriptProjects>

<Packages>
<!--A query to get all tables from a certain database and loop through that collection-->
<# string sConn = @"Provider=SQLNCLI11.1;Server=.;Initial Catalog=ssisjoostS;Integrated Security=SSPI;";#>
<# string sSQL = "SELECT name as TableName FROM dbo.sysobjects where xtype = 'U' and category = 0 ORDER BY name";#>
<# DataTable tblAllTables = ExternalDataAccess.GetDataTable(sConn,sSQL);#>
<# foreach (DataRow row in tblAllTables.Rows) { #>

<!--Create a package for each table and use the tablename in the packagename-->
<Package ProtectionLevel="DontSaveSensitive" ConstraintMode="Parallel" AutoCreateConfigurationsType="None" Name="ssisjoost_<#=row["TableName"]#>">
<Variables>
<Variable Name="maxrownumber" DataType="Int32">0</Variable>
</Variables>

<!--The tasks of my control flow: get max rownumber and a data flow task-->
<Tasks>
<!--Execute SQL Task to get max rownumber from destination-->
<ExecuteSQL
Name="SQL - Get max rownumber <#=row["TableName"]#>"
ConnectionName="Destination"
ResultSet="SingleRow">
<DirectInput>SELECT ISNULL(max([rownumber]),0) as maxrownumber FROM <#=row["TableName"]#></DirectInput>
<Results>
<Result Name="0" VariableName="User.maxrownumber" />
</Results>
</ExecuteSQL>

<!--Data Flow Task to fill the destination table-->
<Dataflow Name="DFT - Process <#=row["TableName"]#>">
<!--Connect it to the preceding Execute SQL Task-->
<PrecedenceConstraints>
<Inputs>
<Input OutputPathName="SQL - Get max rownumber <#=row["TableName"]#>.Output"></Input>
</Inputs>
</PrecedenceConstraints>

<Transformations>
<!--My source with dynamic, but ugly * which could be replace by some .NET/SQL code retrieving the columnnames-->
<OleDbSource Name="OLE_SRC - <#=row["TableName"]#>" ConnectionName="Source">
<DirectInput>SELECT * FROM <#=row["TableName"]#></DirectInput>
</OleDbSource>

<ScriptComponentTransformation Name="SCR - Rownumber">
<ScriptComponentProjectReference ScriptComponentProjectName="SCR - Rownumber" />
</ScriptComponentTransformation>

<!--My destination with no column mapping because all source columns exist in destination table-->
<OleDbDestination Name="OLE_DST - <#=row["TableName"]#>" ConnectionName="Destination">
<ExternalTableOutput Table="<#=row["TableName"]#>"></ExternalTableOutput>
</OleDbDestination>
</Transformations>
</Dataflow>
</Tasks>
</Package>
<# } #>
</Packages>
</Biml>

<!--Includes/Imports for C#-->
<#@ template language="C#" hostspecific="true"#>
<#@ import namespace="System.Data"#>
<#@ import namespace="System.Data.SqlClient"#>


The result
After generating the package with the Script Component we have a neat script for adding the rownumber.
Row number script

Coming this year... Extending SSIS with .NET Scripting

$
0
0
It's not ready yet, but I'm proud to announce the first SSIS book by me and fellow MVP Régis Baccaro (B|T).
Extending SSIS with .NET Scripting


Extending SSIS with .NET Scripting will be a timeless and comprehensive scripting toolkit for SQL Server Integration Services to solve a wide array of everyday problems that SSIS developers encounter. The detailed explanation of the Script Task and Script Component foundations will help you to develop your own scripting solutions, but this book will also show a broad arsenal of readymade and well documented scripting solutions for all common problems.

Feel free to contact us for ideas and suggestions. We will post status updates on twitter and our blogs.

It could be that the number of blogposts will slightly reduce the coming months due writing obligations (but only temporarily).

Reading sensitive parameters in a script

$
0
0
Case
I have a sensitive parameter in my package with a password in it. I want to use it in a Script Task, but when I try that it throws an error: Exception has been thrown by the target of an invocation. Can I use a sensitive parameter in a Script Task or Component?

Exception has been thrown by the target of an invocation.


Solution
Yes you can read sensitive package and project parameters in the Script Task, but with a minor change in the code.

1) Lock for read
First open the Script Task editor and add the parameter to the ReadOnlyVariables field to lock it for read in the script.
ReadOnlyVariables


2) The Script
Open the VSTA environment by clicking in the Edit Script button. In the Main method you have something like this at the moment:
// C# Code (incorrect)
public void Main()
{
// Create string variable to store the parameter value
string mySecretPassword = Dts.Variables["$Package::MySecretPassword"].Value.ToString();

// Show the parameter value with a messagebox
MessageBox.Show("Your secret password is " + mySecretPassword);

// Close the Script Task with success
Dts.TaskResult = (int)ScriptResults.Success;
}

Change the .Value in to .GetGetSensitiveValue() in order to retrieve the sensitive information. But from now on you are responsible for not leaking the sensitive information accidentally!

// C# Code (correct)
public void Main()
{
// Create string variable to store the parameter value
string mySecretPassword = Dts.Variables["$Package::MySecretPassword"].GetSensitiveValue().ToString();

// Show the parameter value with a messagebox
MessageBox.Show("Your secret password is " + mySecretPassword);

// Close the Script Task with success
Dts.TaskResult = (int)ScriptResults.Success;
}
The Result
Now run the script to see the result.
Oops


Note: This GetSensitiveValue method is not available in the Script Component. And when using the .Value you get an error: Accessing value of the parameter variable for the sensitive parameter "MySecretPassword" is not allowed. Verify that the variable is used properly and that it protects the sensitive information. A tricky/ugly workaround could be to use a Script Task to retrieve the sensitive parameter and to save it in a regular package variable and then use the variable in the Script Component (but be careful!).

Timeout after 30 seconds when executing package via .NET

$
0
0
Case
I'm executing a package via .NET (example 1, example 2), but if the packages takes more than 30 seconds I get an error: Timeout expired.  The timeout period elapsed prior to completion of the operation or the server is not responding. Changing the timeout in the connection string to for example 300 has no effect.

// C# Code (incorrect)
// Connection to the database server where the packages are located
using (SqlConnection ssisConnection = new SqlConnection("Data Source=.;Initial Catalog=master;Integrated Security=SSPI;Connection Timeout=300")
{
try
{
// SSIS server object with connection
IntegrationServices ssisServer = new IntegrationServices(ssisConnection);

// The reference to the package which you want to execute
PackageInfo ssisPackage = ssisServer.Catalogs["SSISDB"].Folders["SSISJoost"].Projects["MyProject"].Packages["MyPackage.dtsx"];

// Add execution parameter to override the default asynchronized execution. If you leave this out the package is executed asynchronized
Collection<PackageInfo.ExecutionValueParameterSet> executionParameter = new Collection<PackageInfo.ExecutionValueParameterSet>();
executionParameter.Add(new PackageInfo.ExecutionValueParameterSet { ObjectType = 50, ParameterName = "SYNCHRONIZED", ParameterValue = 1 });

// Add a package parameter
executionParameter.Add(new PackageInfo.ExecutionValueParameterSet { ObjectType = 30, ParameterName = "myStringParam", ParameterValue = "some value" });

// Get the identifier of the execution to get the log
long executionIdentifier = ssisPackage.Execute(false, null, executionParameter);
}
catch (exception ex)
{
// Log code for exceptions
}
}


Solution
The 30 seconds is the default timeout which apparently can't be changed in the ssisPackage.Execute command. The solution is a little dirty. First remove the SYNCHRONIZED parameter to execute the package asynchronized. Then add some code after the ssisPackage.Execute command.
// C# Code (correct)
using (SqlConnection ssisConnection = new SqlConnection("Data Source=.;Initial Catalog=master;Integrated Security=SSPI;")
{
try
{
// SSIS server object with connection
IntegrationServices ssisServer = new IntegrationServices(ssisConnection);

// The reference to the package which you want to execute
PackageInfo ssisPackage = ssisServer.Catalogs["SSISDB"].Folders["SSISJoost"].Projects["MyProject"].Packages["MyPackage.dtsx"];

// Add execution parameter to override the default asynchronized execution. If you leave this out the package is executed asynchronized
Collection<PackageInfo.ExecutionValueParameterSet> executionParameter = new Collection<PackageInfo.ExecutionValueParameterSet>();
//executionParameter.Add(new PackageInfo.ExecutionValueParameterSet { ObjectType = 50, ParameterName = "SYNCHRONIZED", ParameterValue = 1 });

// Add a package parameter
executionParameter.Add(new PackageInfo.ExecutionValueParameterSet { ObjectType = 30, ParameterName = "myStringParam", ParameterValue = "some value" });

// Get the identifier of the execution to get the log
long executionIdentifier = ssisPackage.Execute(false, null, executionParameter);

// Get execution details with the executionIdentifier from the previous step
ExecutionOperation executionOperation = ssisServer.Catalogs["SSISDB"].Executions[executionIdentifier];

// Workaround for 30 second timeout:
// Loop while the execution is not completed
while (!(executionOperation.Completed))
{
// Refresh execution info
executionOperation.Refresh();

// Wait 5 seconds before refreshing (we don't want to stress the server)
System.Threading.Thread.Sleep(5000);
}
}
catch (exception ex)
{
// Log code for exceptions
}
}
Thanks to SequelMate and HansAnderss

SSIS 2016 CTP2 - Incremental Deployment

$
0
0
Case
Incremental Deployment was announced in CTP2. How do I test this without a new SSDT-BI?

Solution
You need to start ISDeploymentWizard.exe from [Drive]:\Program Files\Microsoft SQL Server\130\DTS\Binn
ISDeploymentWizard.exe from the 130 folder


In the second screen have to select Package Deployment. After that you can browse to your Visual Studio (SSDT-BI) folder where your SSIS 2014 project is located. You can also copy and paste the folderpath and then hit the Refresh button. Now you are able to uncheck some of the packages.
Incremental Deployment

SSIS Feature Pack for Azure


Azure Upload and Download Tasks

$
0
0
Case
Microsoft released the SSIS Feature Pack for Microsoft Azure (2012, 2014), but how do the upload and download tasks work?
Azure Blob Upload and Download Tasks


Solution

1) Storage Account
First make sure you have an Azure account that has an storage account in it. Besides the name the location is also important. Especially for the Azure HDInsight Create Cluster Task. Mine is called SSISJoost.
Storage Account


2) Access Keys
Click on the Manage Access Keys icon to get the primary access key. We need this for the Azure Storage Connection Manager.
Storage Account Access Keys


3) Connection Manager for Azure Storage
If you haven't already installed the SSIS Feature Pack for Microsoft Azure then now it's time to do that. Create a new Connection Manager for Azure Storage by right clicking the Connection Managers Pane. Then choose New Connection... and then AzureStorage. Fill in the Storage account name from step 1 and the Access key from step 2. Test the connection and click OK to save the new Connection Manager.
SSIS Connection Manager for Azure Storage


4) Azure Blob Upload Task
Then add the Azure Blob Upload Task to the surface of the Control Flow and give it a descriptive name (and description).
AzureStorageConnection: select the Connection Manager from step 3 or create a new one.
BlobContainer: specify the name of the container where you want to store the files. It creates a new container if it doesn't exist. The name should be in lower case.
BlobPath: specify an optional 'subfolder'. Use / if you don't need 'subfolders'.
FileName: specify a filename or wildcard filter to select the file(s) that needs to be uploaded.
ModifiedAfter and ModifiedBefore: specify data filters or leave them unchanged
LocalPath: specify the folder on your server/computer where the files are stored.
Azure Blob Upload Task


5) Result Upload Task
Now execute the Azure Blob Upload Task and go to azure to see the result.
Upload result


6) Azure Blob Upload Task
Then add the Azure Blob Download Task to the surface of the Control Flow and give it a descriptive name (and description).
AzureStorageConnection: select the Connection Manager from step 3 or create a new one.
LocalPath: specify the folder on your server/computer where the files will be stored.
FileName: specify a filename or wildcard filter to select the file(s) that needs to be downloaded.
ModifiedAfter and ModifiedBefore: specify data filters or leave them unchanged
BlobContainer: specify the name of the container where the files are stored on Azure
BlobPath: specify an optional 'subfolder'. Use / if you didn't used 'subfolders'.
Azure Blob Download Task


Tip: You can also use the Azure Blob Source and Destination to upload and download files.
Note: Unfortunately an Azure File System Task (to for example delete files) is still missing...


Azure Blob Source and Destination

$
0
0
Case
Microsoft released the SSIS Feature Pack for Microsoft Azure (2012, 2014), but how do the Azure Blob Source and Destination components work?

Azure Blob Source and Destination


Solution

1) Storage Account
First make sure you have an Azure account that has an storage account in it. Besides the name the location is also important. Especially for the Azure HDInsight Create Cluster Task. Mine is called SSISJoost.
Storage Account


2) Access Keys
Click on the Manage Access Keys icon to get the primary access key. We need this for the Azure Storage Connection Manager.
Storage Account Access Keys


3) Connection Manager for Azure Storage
If you haven't already installed the SSIS Feature Pack for Microsoft Azure then now it's time to do that. Create a new Connection Manager for Azure Storage by right clicking the Connection Managers Pane. Then choose New Connection... and then AzureStorage. Fill in the Storage account name from step 1 and the Access key from step 2. Test the connection and click OK to save the new Connection Manager.
SSIS Connection Manager for Azure Storage


4) Azure Blob Destination
Add the Azure Blob Destination to the surface of your data flow and connect it to the preceding transformations. The properties are very limited. You don't have to specify things like datatypes and qualifiers. If you want to specify those you first use a Flat File Destination to store the file locally and then use the Azure Blob Upload Task to upload the file to Azure.
Azure storage connection manager: use the connection manager from step 3 or create a new one.
Blob container name: specify the containername of Azure where you want to store the file. A new container will be created if it doesn't exist.
Blob name: The name of the file optionally with a 'subfolder'. In the Azure Blob Upload Task these are two separate fields.
Blob file Format: specify the format of the file - CSV or AVRO.
CSV file column delimiter: if you chose CSV you can specify the column delimiter.
First row as column names: if you chose CSV you can specify whether you need a header row.
Azure Blob Destination


5) Result blob destination
Run the data flow and go to Azure to see the result. In mycontainer you should see the newly added file.
Result of Azure Blob Destination


6) Azure Blob Source
Add the Azure Blob Source to the surface of your data flow and edit it. Again the properties are very limited. You can't specify things like datatypes and qualifiers just like with an Excel Source. If you want to specify datatypes, qualifiers, etc. you first use the Azure Blob Download Task to download the file and then use a regular Flat File Source component.
Azure storage connection manager: use the connection manager from step 3 or create a new one.
Blob container name: specify the containername of Azure where the file is stored.
Blob name: The name of the file optionally with a 'subfolder'. In the Azure Blob Download Task these are two separate fields.
Blob file Format: specify the format of the file - CSV or AVRO.
CSV file column delimiter: if you chose CSV you can specify the column delimiter.
First row as column names: if you chose CSV you can specify whether there is a header row.
Azure Blob Source


Tip: You can also use the Foreach Azure Blob Enumerator in combination with the Azure Blob Source

Azure Blob Enumerator

$
0
0
Case
Microsoft released the SSIS Feature Pack for Microsoft Azure (20122014), but how does the Foreach Azure Blob Enumerator work?
Foreach Azure Blob Enumerator


Solution
The Azure Blob Enumerator works just like any other enumerator. The best combination is with a Data Flow Task and an Azure Blob Source. It returns the blob filename on Azure including the blobpath: MyFolder\Weather.csv. Perfect for the Azure Blob Source where it is also one value.

1) Storage Account
First make sure you have an Azure account that has an storage account in it. Besides the name the location is also important. Especially for the Azure HDInsight Create Cluster Task. Mine is called SSISJoost.
Storage Account


2) Access Keys
Click on the Manage Access Keys icon to get the primary access key. We need this for the Azure Storage Connection Manager.
Storage Account Access Keys


3) Connection Manager for Azure Storage
If you haven't already installed the SSIS Feature Pack for Microsoft Azure then now it's time to do that. Create a new Connection Manager for Azure Storage by right clicking the Connection Managers Pane. Then choose New Connection... and then AzureStorage. Fill in the Storage account name from step 1 and the Access key from step 2. Test the connection and click OK to save the new Connection Manager.
SSIS Connection Manager for Azure Storage


4) Variable
Add a string variable to store the azure filepath in. Mine is called AzureBlobPath
String variable


5) Foreach Azure Blob Enumerator
Add the Foreach Azure Blob Enumerator to the surface of your control flow and edit it. On the collection page choose Foreach Azure Blob Enumerator.
Azure storage connection: use the connection manager from step 3 or create a new one.
Blob container name: specify the containername of Azure where the files are stored.
Blob path: The optional 'subfolder'. Add / if you didn't use 'subfolders'.
Blob file name filter: specify the wildcard to select the files.
Blob file modified after and Blob file modified before: Optional date filters.
Foreach Azure Blob Enumerator


Blob container name, Blob path & Blob file name filter


5) Expression
Now go to the properties of the data flow task that contains the Azure Blob Source Component. Just like the XML source the expressions are not on the source component itself. Now you can add an expression on the Blob Name to replace it with the value of the string variable @[User::AzureBlobPath] from step 4.
Expressions on Data Flow Task properties

Azure HDInsight Create / Delete Cluster Tasks

$
0
0
Case
Microsoft released the SSIS Feature Pack for Microsoft Azure (20122014), but how do the Azure HDInsight Cluster Task work?
Create / Delete HDInsight Cluster


Solution
With these tasks you can create an HDInsight cluster (and then do some Hive or Pig tasks) and then delete it when you're ready with the cluster.

1) Storage Account
First make sure you have an Azure account that has an storage account in it. Besides the name the location is also important. You need to use the same location in the Azure HDInsight Create Cluster Task. Mine is called SSISJoost.
Storage Account


2) Access Keys
Click on the Manage Access Keys icon to get the primary access key. We need this for the Azure Storage Connection Manager.
Storage Account Access Keys


3) Connection Manager for Azure Storage
If you haven't already installed the SSIS Feature Pack for Microsoft Azure then now it's time to do that. Create a new Connection Manager for Azure Storage by right clicking the Connection Managers Pane. Then choose New Connection... and then AzureStorage. Fill in the Storage account name from step 1 and the Access key from step 2. Test the connection and click OK to save the new Connection Manager.
SSIS Connection Manager for Azure Storage


4) Makecert.exe (Certificate Creation Tool)
Open the Visual Studio Command prompt to create a new certificate with Makecert.exe. The command is as follows (but replace SSISJoostCertificate by your own name, twice):
makecert -sky exchange -r -n "CN=SSISJoostCertificate" -pe -a sha1 -len 2048 -ss My "SSISJoostCertificate.cer" 
Makecert.exe


5) Azure Subscription ID
Go to manage.windowsazure.com and locate your Subscription ID under settings. You need this in  one of the next steps.
Locate Subscription Id


6) Upload Certificate
Go to manage.windowsazure.com and then to Settings (1) and then to Management certificates (2). Upload (3) the .cer file created in step 4 and notice the thumbprint (4).
Management certificates


7) Azure Subscription Connection Manager
Create a new Azure Subscription Connection Manager by right clicking the Connection Managers Pane. Then choose New Connection... and then AzureSubscription. Fill in the Azure Subscription ID from step 5 and browse to find your certificate, The thumbprint should be the same as in step 6. Test the connection and click OK to save the new Connection Manager.
Azure Subcription


8) Azure HDInsight Create Cluster Task
Add the Azure HDInsight Create Cluster Task to the surface of the control flow. Give it a suitable name and then edit the task. Under connections you must select the two newly created connection managers (step 3 and 7). And then change the General properties:
ClusterName: the name of your cluster
ClusterSizeInNodes: the number of nodes (be careful or you get a high invoice if you choose a high number)
StorageContainerName: specify a container from your storage account to store the data in
UserName: specify a new username
Password: specify a new password
Location: choose the same location as your storage account (see step 1)
FailIfExists: Specify whether the task should fail if it already exists
Azure HDInsight Create Cluster Task


9) Test
Run the task and check whether a HDInsight cluster is created. If could take a while (single node in North Europe took ± 20 minutes). When it is ready you can performe a Hyve or Pig Task on this cluster.
HDInsight Cluster


10) Delete cluster
When your PIG and/or Hive Tasks are ready you can delete the cluster with the Azure HDInsight Cluster Task. Drag it to the surface and give it a suitable name. Edit it and select the Azure Subscription Connection Manager from step 7. The ClusterName is the name of the cluster you want to delete (same name as in step 8). And the FailIfNotExists indicates whether the task should fail if the cluster is already deleted. Now run the task to delete the cluster. Should be a lot faster than creating a new cluster.
Azure HDInsight Cluster Task


SQL Server PDW Destination shows advanced editor only

$
0
0
Case
I'm using PDW Destination adapter for SQL 2012 (V10.0.6186) from Control Node AU3 patch v10.62.14 and it only shows the Advanced Editor.
Advanced Editor PDW Destination


Solution
A know cause is that the package is generated with BIML (not MIST) by using the customcomponent tag. Messing up a single property can cause not showing the correct editor. If it's not generated with BIML, then download the latest version from the APS AU3 download page:Analytics Platform System Appliance Update 3 Documentation and Client Tools. At the time of writing V10.0.6205 was the latest version to download. This solved the problem:
The correct editor for the PDW Destination


Thanks to Greg Galloway and James Anthony Rowland-Jones.
Viewing all 149 articles
Browse latest View live